|
A supplement to the |
|
Website and eBook by Cyril J Wood |
|
A supplement to the |
|
Website and eBook by Cyril J Wood |
|
|
|
|
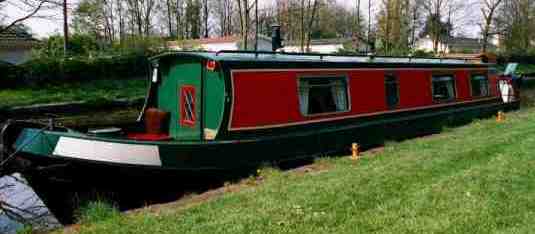
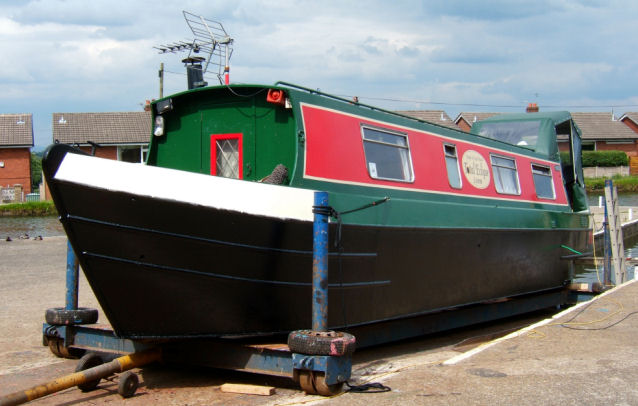
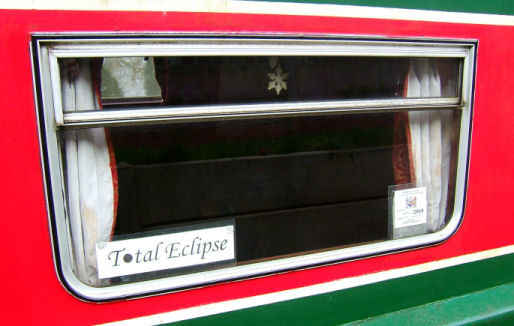
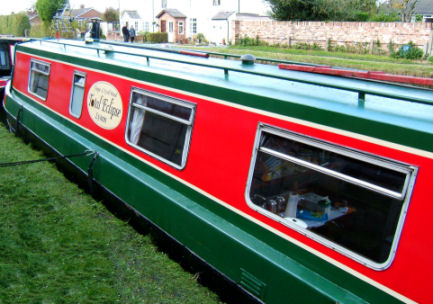
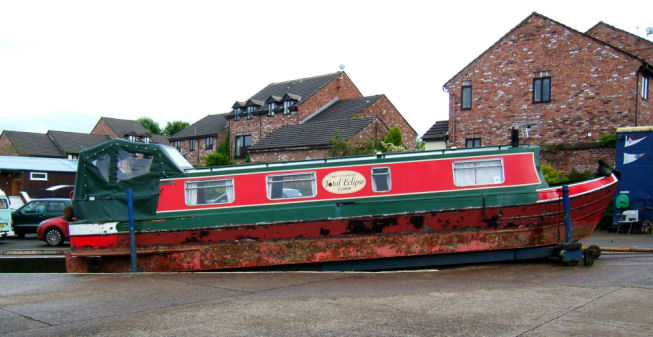
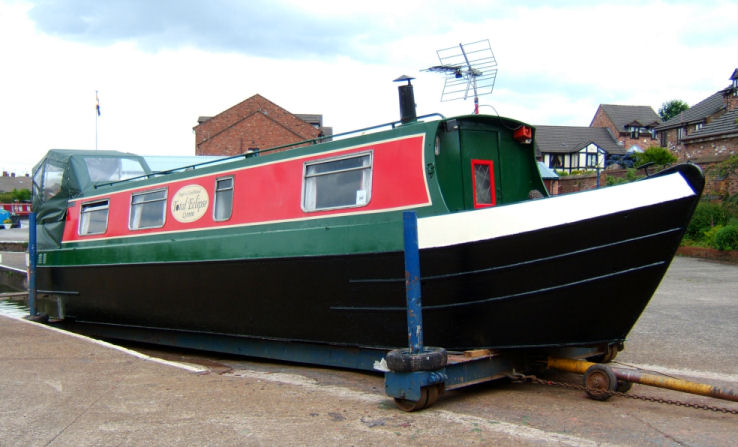
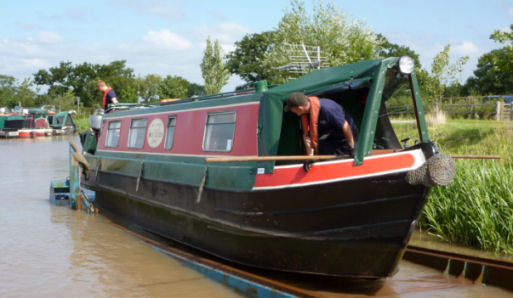
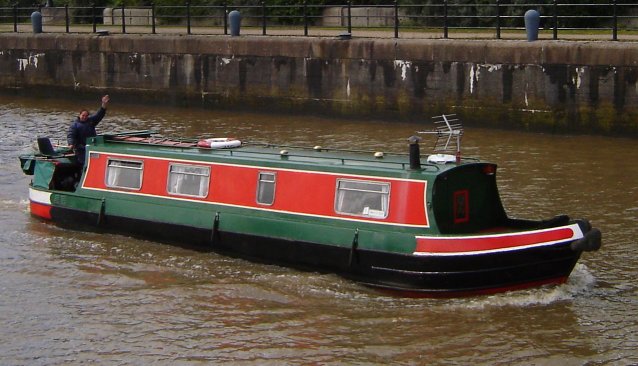
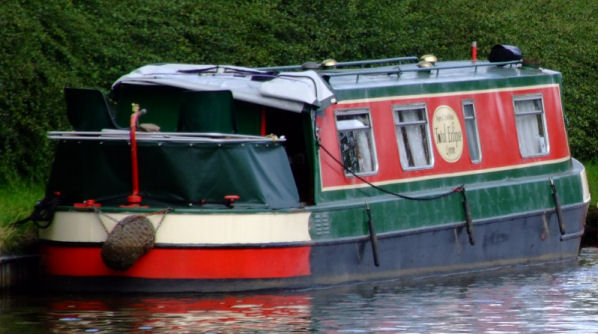
nb "Total Eclipse" at Ellesmere on the Llangollen Canal
Introduction to "Total Eclipse"
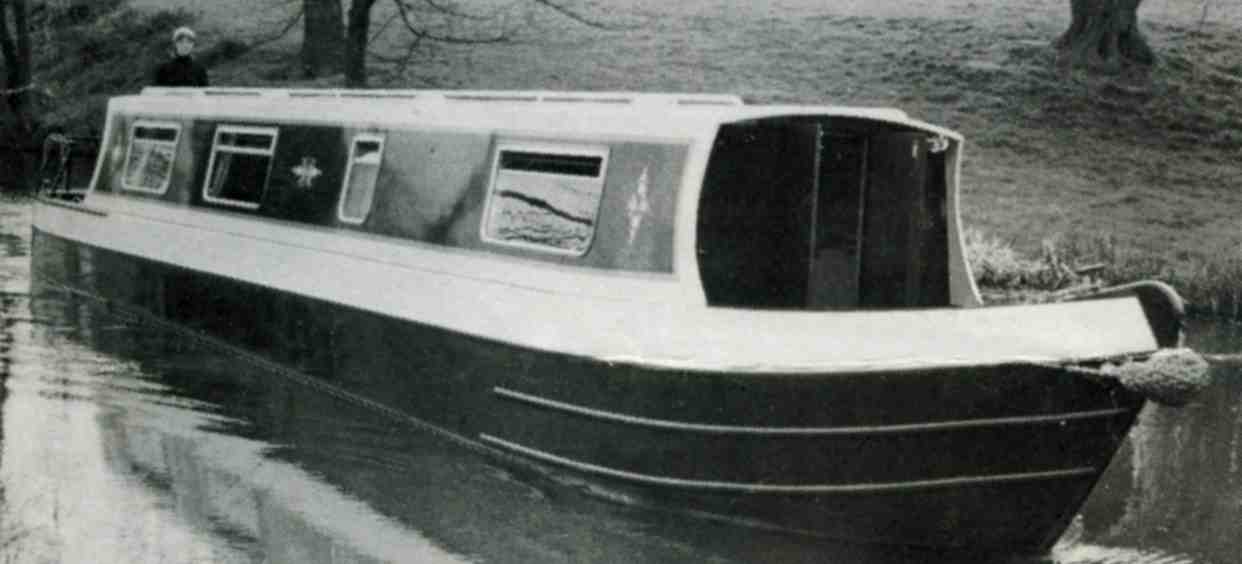
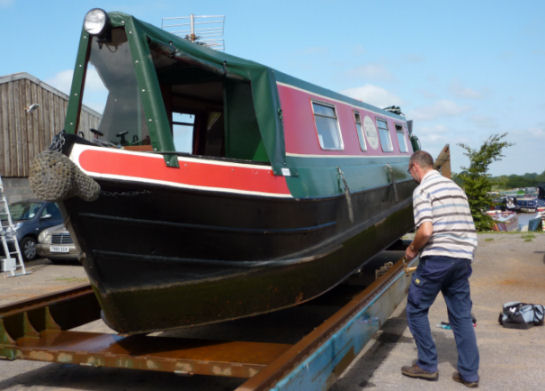
Job number 2755 immediately after being launched
(Photograph - Hancock and Lane Ltd)
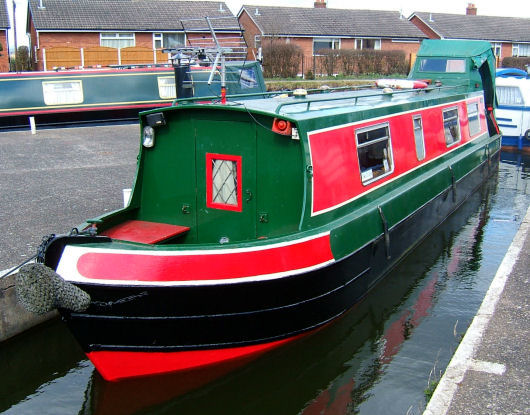
"Total Eclipse” is a Hancock and Lane Norseman S40 narrowboat. This part of the "Canalscape" website shares with you a little about the boat, its history, explains what we have already accomplished and plan to accomplish in the future in words, diagrams and photographs. How we came to purchase is documented in "Canalscape Book 3" - Chapter Two so I will not bore the reader with duplicating that story here. The above photograph is reproduced from a Hancock and Lane promotional leaflet entitled "Boat Building News" which featured a "road test" of H & L's Norseman S40 (and the boat used just happened to be 2755) conducted by the now defunct Canal and Riverboat Magazine. The brochure also illustrated other examples of Hancock and Lane products.
 |
Hancock and Lane Trade Mark (logo) |
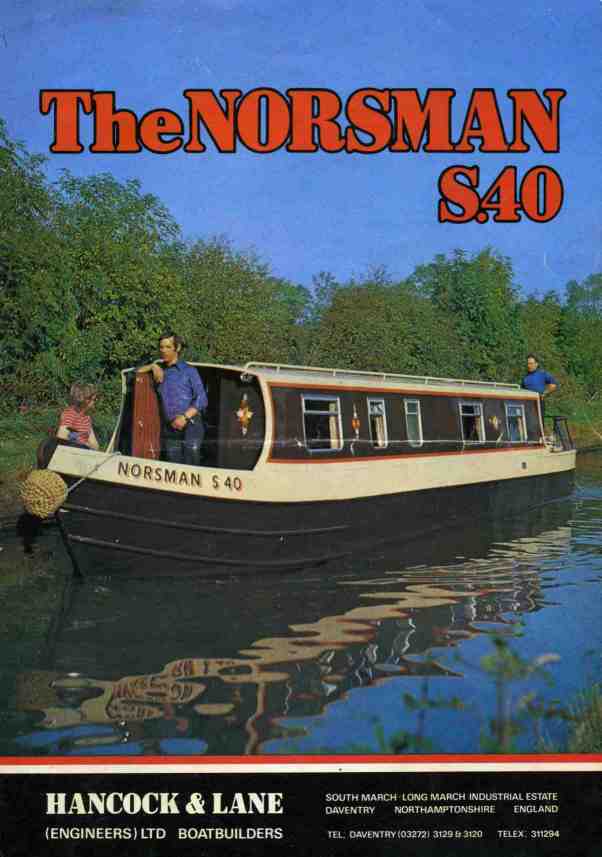
An original Hancock and Lane "Norseman S40" sales brochure
The example illustrated on the front cover of the brochure above illustrates the standard Hancock and Lane colour scheme that 2755 was originally finished in and differs slightly from 2755 in the layout and number of windows. Hancock and Lane went out of business in the early 1990's after nearly thirty years of boat building, completing hundreds of narrowboats of various types ranging from narrowboats up to seventy feet in length cruisers to workboats for BW (see Other Examples and Similar Designs) and wide beam cruisers for the English, Irish and Continental waterways during that period.
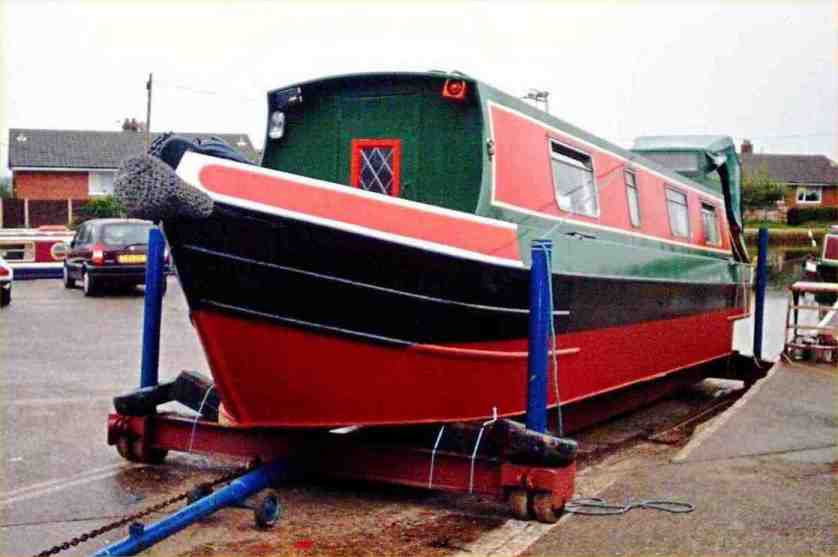
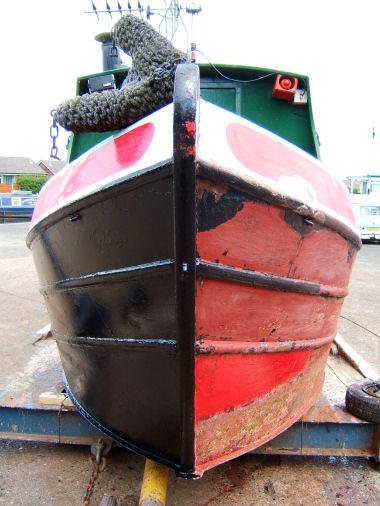
Hancock and Lane's job number 2755 was built at their workshops in Daventry, Northamptonshire under the supervision of works manager Mike Gration and was completed in 1982 as the company's Norseman S40 1982 London Boat Show demonstrator. As a demonstration boat it was required to be moved regularly and not on water either! Consequently, it was constructed from heavier grade steel than the normal Hancock and Lane boats and features a full-length keel to prevent the boat from flexing. This would ensure that the cupboard and compartment doors open and close correctly whilst the boat was out of the water. Consequently, the boat's weight is approximately 10 tons. The drawback to this is its draft. At the bow (with a full water tank) the draft is 1'6" from waterline to tip of the keel with a 2'6" draft at the stern from waterline to the bottom of the stepped skeg. The hull has quite long fore and aft swims for a boat of this type helping it to keep a straight line (assisted, no doubt by the keel)... even in reverse provided that the engine revolutions are right, the tiller is in the correct position to counteract prop thrash (the steering effect caused by the propeller's rotation acting as a paddle) and that there is sufficient depth of water beneath the keel. Wash is also kept to a minimum by the hull design utilising nice long bow and stern swims.

Close-up of the leading edge of the keel which runs the full length of the hull...
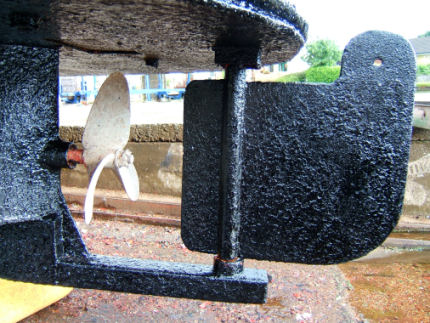
... and the "business end" . Note the deep stepped skeg and base plate thickness
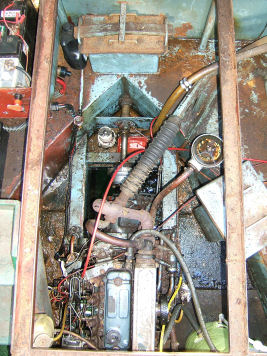
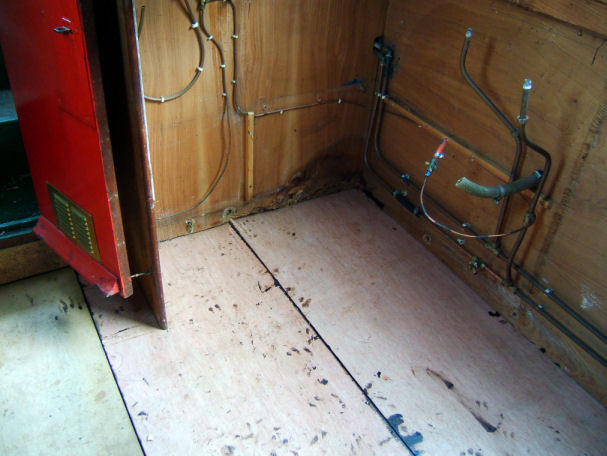
The engine installed is a BMC 1500 diesel unit marinised by J G Meakes and also known as a BMC "Captain" giving an output of approximately 40 horse power and is coupled to a Newage/PRM 2:1 gearbox. The engine is raw water cooled via a Bowman heat exchanger and has a calorifier for heating the hot water stored in an insulated, vertically mounted cylinder. The gearbox is also water cooled. A steel fuel tank holding 50 gallons is fitted into the stern and a 150 gallon polypropylene fresh water tank fills the space in the bow beneath the foredeck floor. The original alternator was a Lucas 17ACR-M with a maximum output of 38 amps which, via a split charge relay, charged a 110 ah deep-cycle leisure battery and a 96 ah starter battery. The engine and domestic electrical systems were originally earthed through the hull but when installing a second domestic battery I rewired the system with a separate earth cable to the battery isolation switch in line with modern day practice and not connected directly to the boat's hull, as was previously the case.


Total Eclipse's BMC 1500 engine and Newage/PRM 100 gearbox
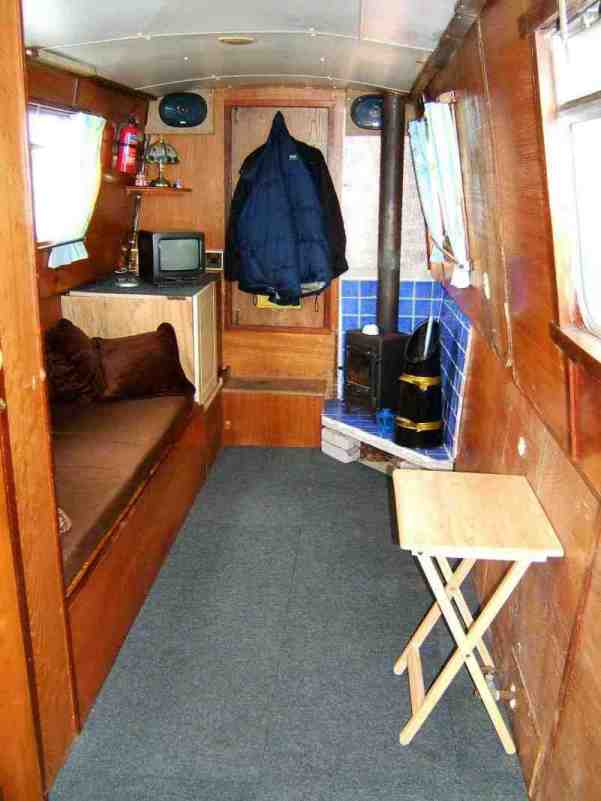
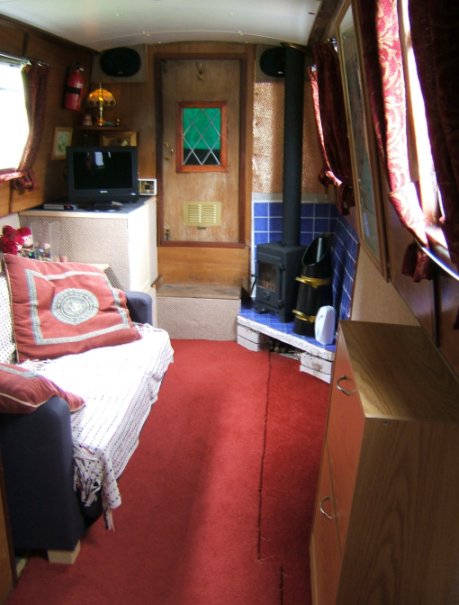
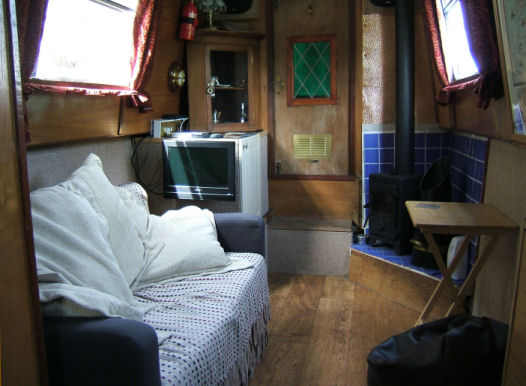
The gas supply is provided by two 13kg propane (orange) cylinders stored in a self-draining locker on the rear deck. There are now only two gas appliances... a Valor Vanessa cooker and an Electrolux RM 212F gas/240 volt/12 volt refrigerator. When new, the boat was fitted as standard with a catalytic gas fire which was one of the first items that I removed after we bought the boat as I consider them to be a safety hazard being prone to venting carbon monoxide inside the boat's cabin. A Torgem solid fuel fire was fitted by the previous owner in 1986. The location of the Torgem was where the holding tank for the pump-out toilet used to be. This was removed at the same time as the fire’s installation and a Thetford Porta Potti installed in its place. In 2005 the Torgem was removed and replaced with a Carabo solid fuel fire in a different location… adjacent to the starboard/front cabin bulkhead.
The dark and confined interior prior to removing the toilet compartment...
... and in 2005 with the compartment removed and fire relocated
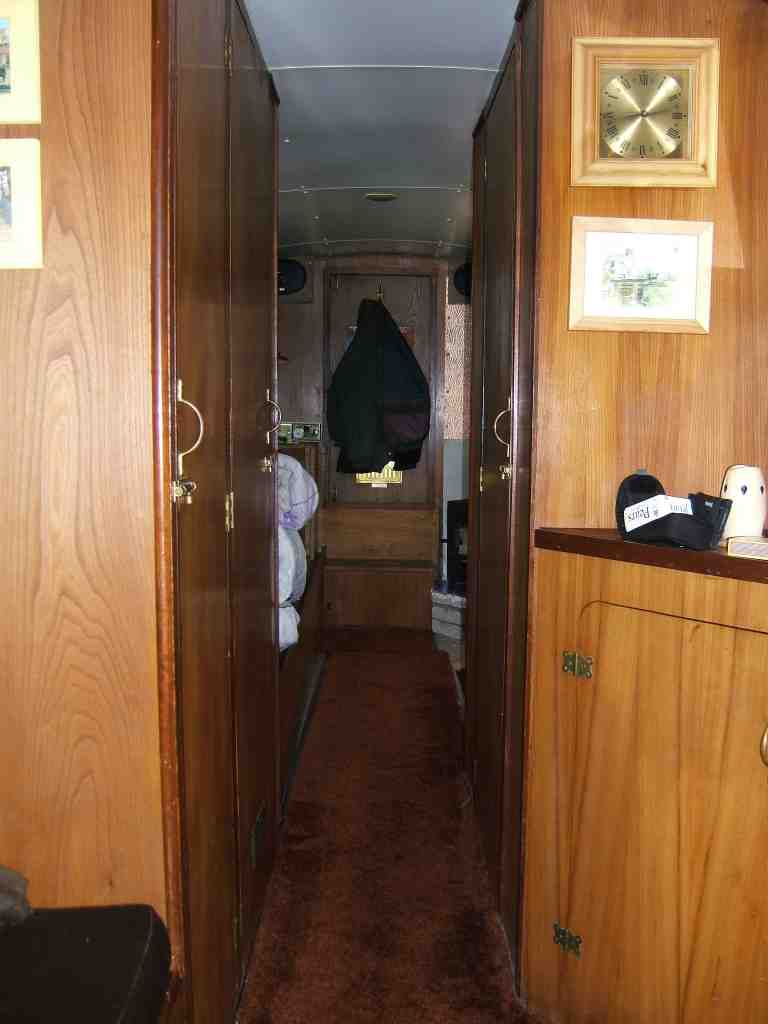
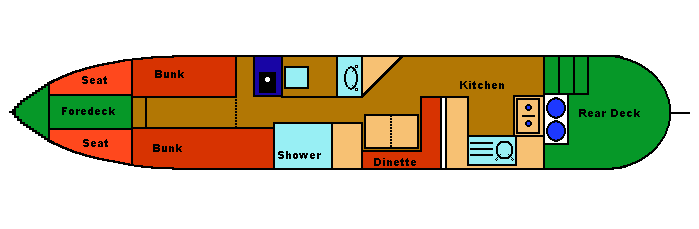
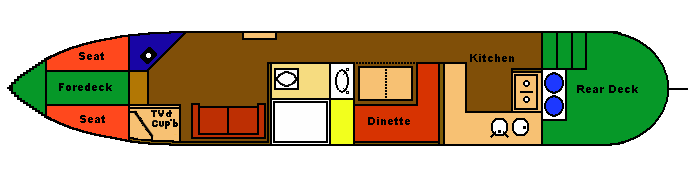
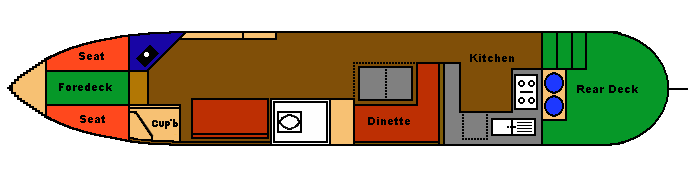
Originally as built, she was a four/six berth craft. This configuration consisted of one convertible double berth where the table and "L" shaped seating is situated between the wardrobe and the kitchen and four single bunks arranged in two two-tiers in the front cabin. The separate toilet and shower compartments could be connected by two doors making the compartment the complete width of the boat.
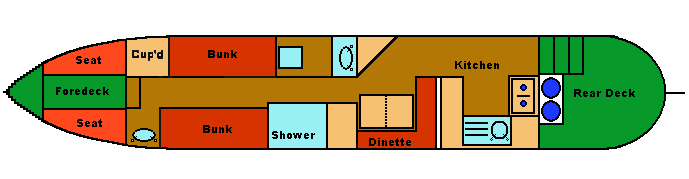
Floor plan as originally built
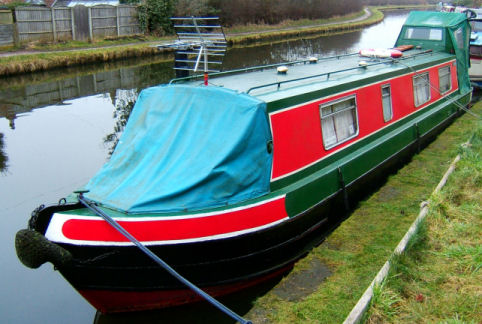
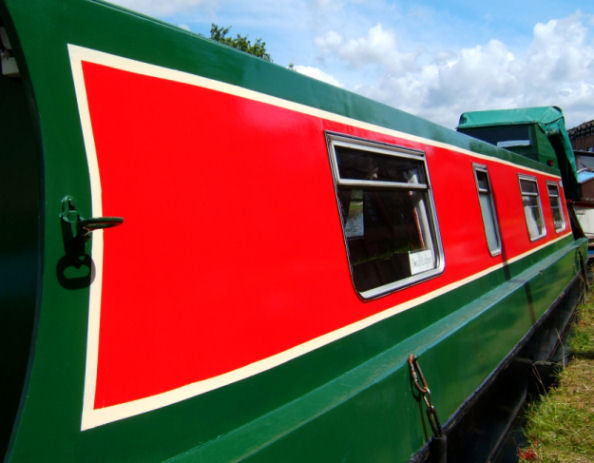
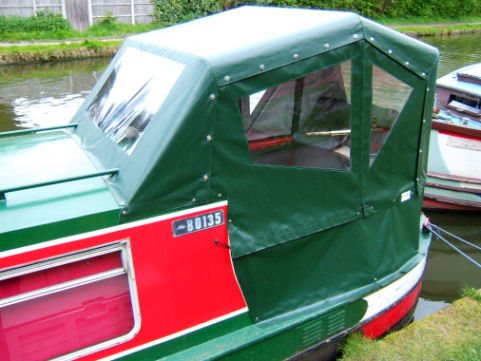
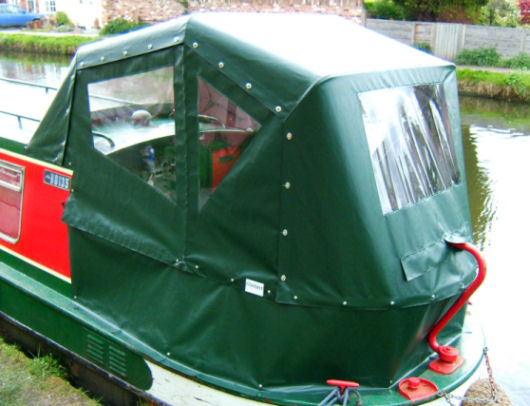
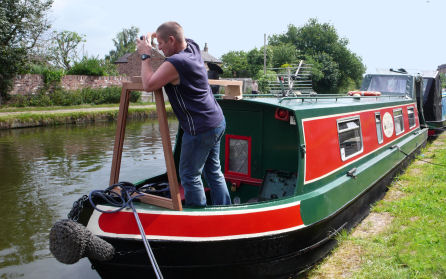
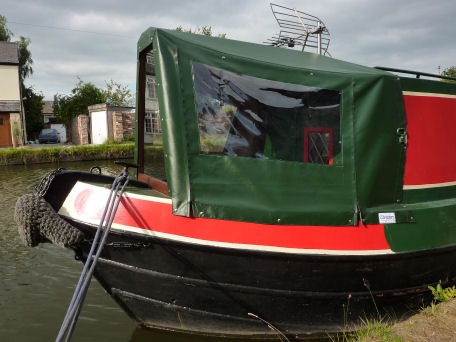
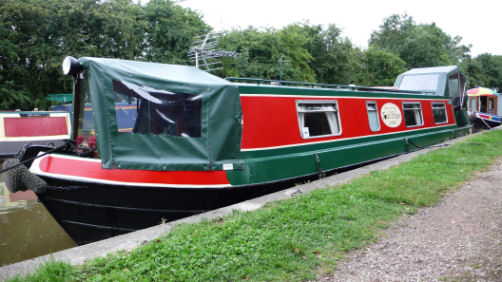
The outward appearance of the boat has changed quite a bit from when it was built. The original paint scheme was black hull and beige superstructure with brown panels which was changed in the early 1980's to the colour scheme that is sported today... black hull, green superstructure with a white bordered red panel on the side of the superstructure. The red and white bow detailing was first added in 2004. The original "flying saucer" roof vents were replaced in the 1990's with brass "mushroom" vents. Another addition to the external appearance was the addition of a collapsible windscreen and rear cockpit cover with a tonnau type cover to the front deck. These appeared around 1989 and have gave good service but in 2009 I replaced the original windscreen after twenty years service.
|
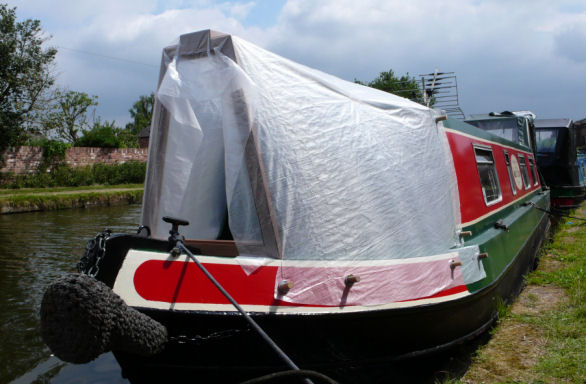
A 2010 photograph showing the tonneau cover over the front deck |
|
and also the windscreen and pram-type cover over the rear deck |
The part of the cover surrounding the rear deck below the handrail known as a "dodger" was originally to be replaced with a steel or wooden "skirt" to increase the weather proofing of the rear deck area (even though it is self-draining) but the complex shape of the hand rail and rear deck perimeter prevents this being accomplished easily and we decided to retain the "dodger" when the time came for replacement. The planned fitting of a cratch board will mean that the front deck cover (fitted at the same time as the original rear deck canopy) will require replacement. This will increase the usable space inside the boat as the current front deck cover does not allow the front door to be opened whilst it is in place.
When the boat had served its purpose as a boat show demonstrator it was sold in 1983 to a private owner... a Mr V Jones who purchased her for £12681.75p and christened her "Cordelia". He had financial problems and the boat was then sold to the next owner... Mr Dave Reed also in 1983. This owner retained the name and owned the boat up to when we bought it from him on 16th July 2002 when she was rechristened "Total Eclipse". The name "Total Eclipse" was derived from a television advertisement for Jaffa Cakes which was being transmitted at the time we purchased her.

Still frames from the Jaffa Cake advertisement... "Full Moon, Half Moon, Total Eclipse!"
|
"Cordelia" in Runcorn Dry Dock - Summer 1987... Note the original stainless steel "Flying Saucer" |
|
style ventilators plus the absence of the windscreen and pram-type cover over the rear deck |
And again in the same dry dock some fifteen years later in February 2002.
The yellow paint is zinc chromate primer
"Cordelia" at Walton in Easter 2001
Floor plan as bought in 2001
Slipped at Lymm CC for hull cleaning and repainting in July 2004...
... and again at Lymm CC in June 2008 looking not too different except for the relocation of the chimney and TV aerial...
... and yet again at Lymm CC in June 2012 with bitumen on the hull instead of gloss paint and a different colour scheme
Modifications and Partial Refitting
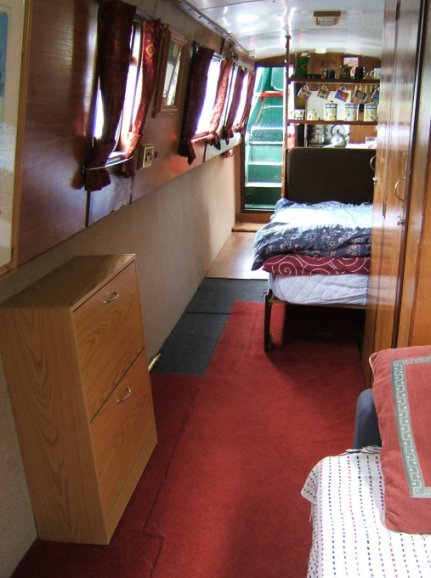
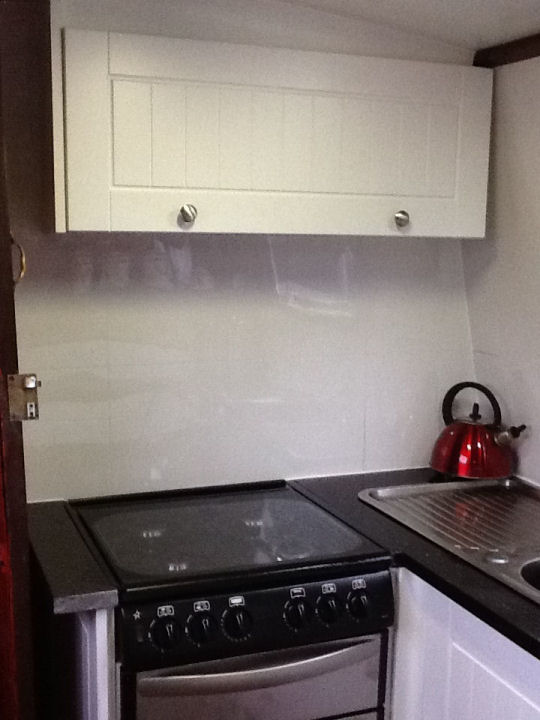
Whilst "Total Eclipse" was in our ownership we were responsible for a number of modifications including... installing a 240 volt ring main, tiling and refurbishing the shower compartment, replacing the solid fuel fire and changing its location. The original interior lights were located adjacent to windows so when the windows were open and the lights on at night they attracted flying insects from outside. We have upgraded the originals with new fluorescent light units and relocated them to the centre of the ceiling where they do not attract as many insects. We have also replaced the original tungsten lighting with LED units and down-lighters. Additional LED units have been installed beneath the gunwales and in the triangular cupboard in the front cabin for subdued and feature lighting. As built, there was a toilet compartment on the starboard side that also contained a hand basin. A triangular cupboard was fitted to the rearward bulkhead of the toilet compartment. This storage space was lost when the toilet compartment (to which it was attached) was removed in 2005. This storage space was replaced with a new cupboard and a television shelf, constructed adjacent to the portside front bulkhead over the fresh water pump and pressure reservoir. The space occupied by the fresh water pump was lined with sound absorbing material which protects against frost as well as making the unit quieter when in use. The dinette unit is still in position but we usually keep it made-up as a double bed unless we are expecting visitors and need extra seating and table space.
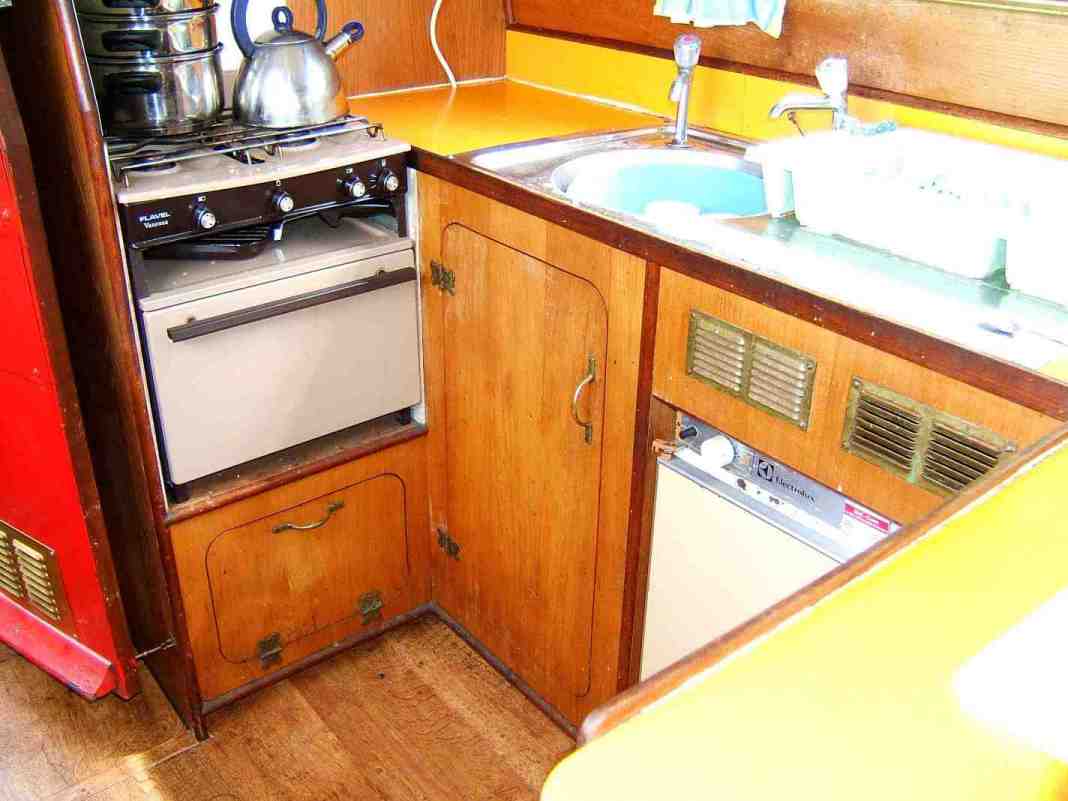
The Kitchen prior to refitting
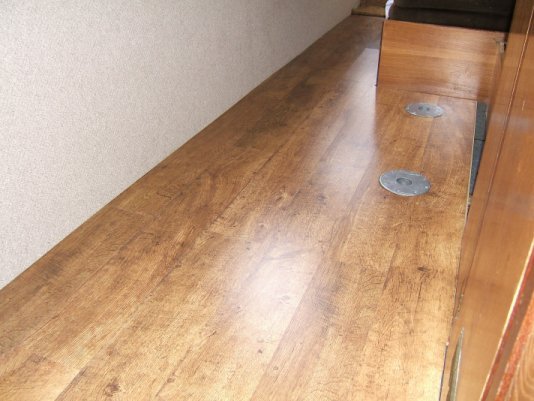
The kitchen is virtually unchanged since construction with the exception of tiles above the cooker and a microwave oven installed beneath the room divider worktop. But this area is earmarked for upgrading and modernisation. This will entail either replacing the original woodwork with modern kitchen units or painting the existing woodwork, fitting new worktops and cupboard doors, removing the original stainless steel sink and drainer and replacing it with a circular basin and matching drainer. The “handing” of the sink/drainer will be reversed so as to improve the amount of worktop space available and make better utilisation of currently unused space. A new cooker will complete this part of the refit nicely. Initially, laminate flooring was been fitted from the back door (concealing the forward bilge hatch), through the kitchen area as far as the end of the room divider adjacent to the tail of the double bed. It proved easier to keep this area clean as well as being more hygienic than the original carpeting which warranted extending along the rest of the boat's interior.
First refit floor plan
In May 2008 we relined the cabin interior lining below the gunwales with carpet. This hid some of the ravages of time (and refitting) as well as being good heat and acoustic insulation but when completed it highlighted the need for new carpet on the floor. A nice red maybe... to match the curtains and cushions or even continue the laminate flooring forward from the kitchen area with a rug in the centre of the floor. The laminate flooring won and was fitted in March 2009 just in time for the start of the boating season. Pieces of laminate flooring left over were cut and shaped to hide the space beneath the solid fuel fire plinth which houses additional ballast beneath.
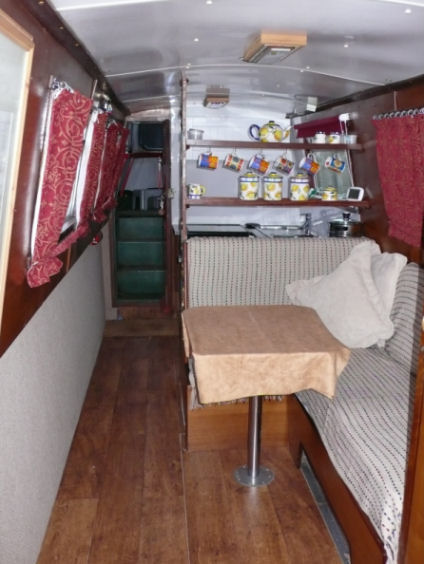
The interior looking aft in July 2008 with the hull lining newly carpeted and cabinet fitted...
... and twelve months later with the laminate flooring fitted
After many hours of deliberation we decided to remove the remaining fixed bunk in the front cabin and replace it with a free-standing futon. During the day the sofa bed is located underneath the gunwales. During the evening it can be rotated through ninety degrees to face the television. It can also be converted to an additional double bed for when we have visitors staying with us. The size of the doors was the deciding factor in the choice of the futon as it had to be self-assembly with each individual part needing to be small enough to fit through either the front or rear doors. The removal of the fixed bunk exposed the wood lining which was then covered in carpet up to beneath the gunwales to match the rest of the boat.
The interior looking forward in June 2008 with the hull lining carpeted and futon installed...
... and two years later in July 2010 with corner cupboard fitted and flooring completed
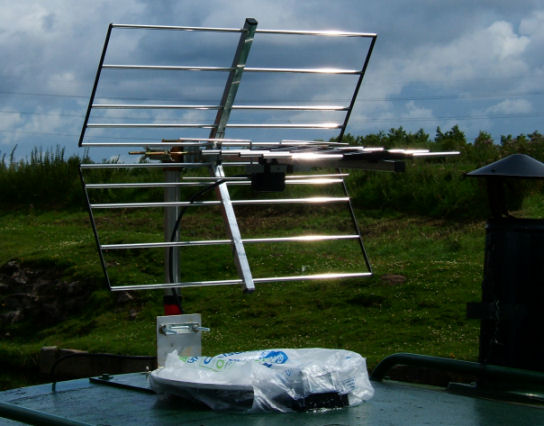
The removal of the fixed bunk highlighted the need for attention to the floor covering. We initially thought about new carpet contrasting with that fitted below the gunwales but later decided to extend the laminate flooring fitted in the kitchen area. This would be easier to clean with a dry floor mop and alleviate the need to vacuum clean the floor. The existing television was replaced with a flat-screen, LCD television complete with a Digibox and Freesat receiver and dish, all of which were carefully chosen to run on 12 volts without the need for an inverter. The satellite dish is attached to the existing tv aerial mast when required via a special galvanised bracket.
|
|
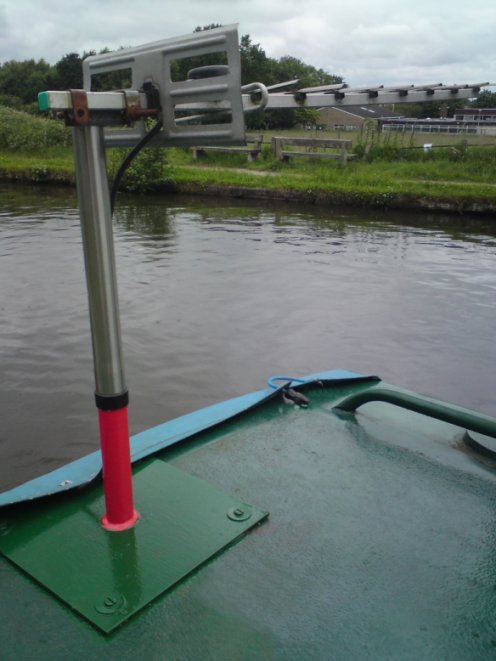
|
The new TV aerial mast (left) and with the new aerial and folded satellite dish (right)
For a long time we had a mains operated "touch lamp" standing on the corner shelf that could only be used when we were on a mains land line. I removed the internal electronics and installed a new in-line switch and bulb holder to which was fitted a 12 volt LED bulb... the first low-energy light on the boat. We could now use the lamp at all times regardless if we were connected to mains electricity or not and without having to worry about power consumption. Whilst out shopping we came across a self-assembly cupboard small enough to fit beneath the gunwales. As well as replacing some of the lost storage space when the fixed bunk in the front cabin was removed it would hide the old pump-out toilet tank drain cock and pipe that protrudes through the cabin lining. Above it the cabin lining was damaged by a water leak from the original solid fuel stove socket in the roof and the adjacent window frame. Instead of disturbing the damaged lining to replace it a large picture frame containing a map of the inland waterways system (previously mounted on the inside of the toilet/shower door) conceals it nicely. Further aft, where the triangular cupboard was located, the lining has holes that accommodated redundant 12 volt and 240 volt electrical sockets. Another identical frame containing a map of the Four Counties Ring was fitted to conceal the holes and further improve the looks of the cabin. The LCD tv was fitted to a swivel-out mounting bracket which left a lot of space on the cupboard next to the front cabin bulkhead. The aerial mast that was fitted in 2002 was starting to show the ravages of time and a replacement unit that was more substantial and galvanised to resist corrosion was purchased and fitted in June 2009. When choosing this unit one of the criteria was that the satellite dish could be mounted onto it. This would require a suitable bracket which was fabricated by a friend and the dish fits really well. The windscreen was starting to rot and was also replaced in June 2009.
The new windscreen prior to painting

The new Lucas A127-L0223 70 amp alternator
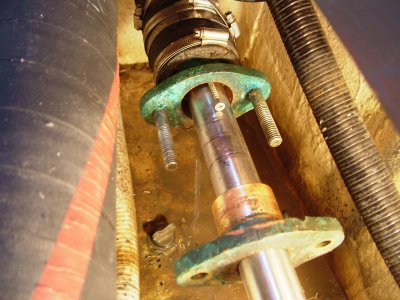
In preparation of the Ribble passage the anchor was mounted on the front deck forward bulkhead and navigation lights fitted. At the same time the starter motor was refurbished, a new 70 amp Lucas A127-L0223 alternator fitted and the original replaceable element oil filter assembly was replaced with the spin-off canister conversion. The calorifier sprung a leak and was originally fitted before the engine was installed. This meant major surgery to remove and repair it. The repair proved to be a temporary one and a new unit will have to be fitted in the not too distant future.
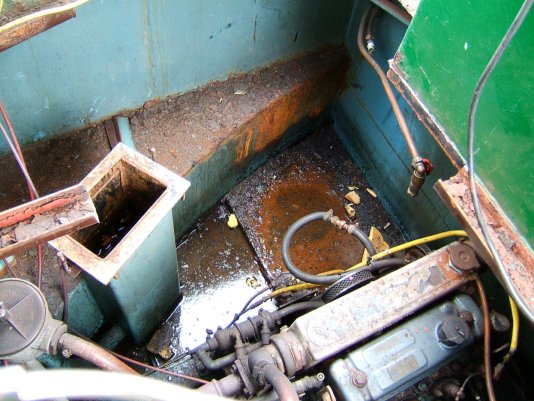
Major surgery to the deck supports to remove the calorifier
"Total Eclipse" engine compartment prior to repainting
The original triangular shelf was removed and an antique oak corner cupboard sourced from eBay was fitted to finish off the corner. I have fitted an LED light unit to the cupboard to illuminate the interior. Around the same time we were given a small drop-leaf table which opens up into a table large enough for the two of us to eat from. When not in use it is the right size to be stored in the wardrobe. December 2009 saw the starter motor refurbished and the stern gland repacked and overhauled in January 2010.
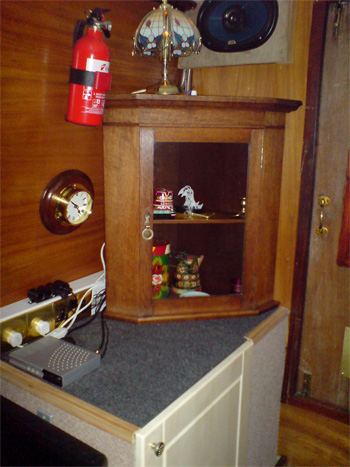
The antique oak corner cupboard sourced from eBay
 |
 |
Stern gland assembly (left) and new packing material (right) before being cut to size
(Note the screw in the centre being used to remove old packing material from the gland in the left hand photograph)
When access to the weed hatch was required the centre deck board had to be removed in its entirety. As the board was the full length of the rear deck this could have caused problems, especially if in open water (where there is no towpath to deposit items onto) or if the rear cover was erected. Consequently, the board in question was cut in two with the rear-most part just long enough to allow access to the weed hatch. This has also necessitated replacing the rear seats as they stood on a portion of this board so a wooden plank was fitted across the handrail and two plastic seat buckets, minus their metal frames, bolted to it.
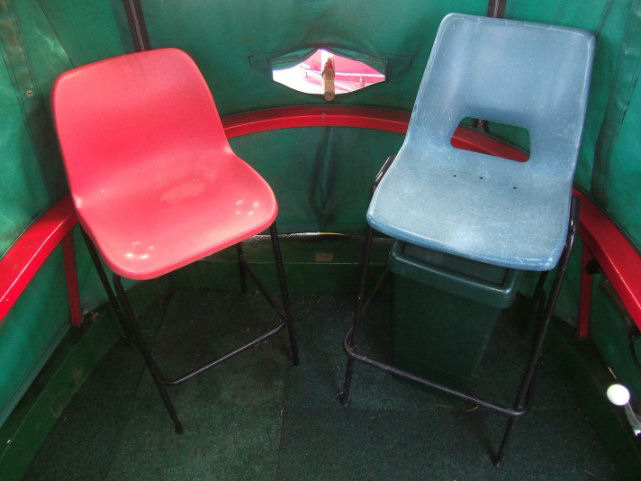
The rear deck with the canopy erected before replacing the loose seats...
... and in May 2007 with the canopy folded with new seating fitted. Note the generator located beneath them
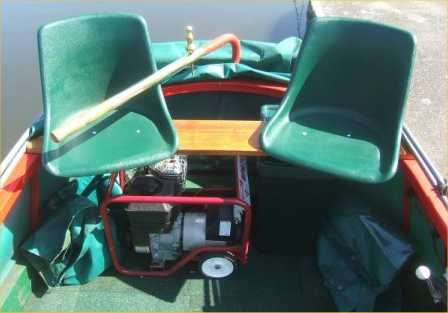
This freed-up the floor space removing the need to move the seats when required. The only problem with the new seating was that the sitter's feet dangled in mid-air having nothing to rest upon. This was remedied by the purchase of two plastic foot stools that were just the right height. The generator was also relocated from the front deck to beneath the new seats on the rear deck. The electrical cable from it to the rear deck land-line socket was laid in the self-draining channels beneath the deck boards. When access to the weed hatch is required the generator is simply wheeled across the rear deck so that it is on the adjacent large deck board. When the generator was moved to the rear deck this removed the need for an extension power lead running the whole length of the boat and the associated voltage drop as well as giving us a tidy and uncluttered front deck where we and guests can sit and relax in comfort.
The uncluttered front deck and rope locker after relocation of the generator
In January of 2010 we moved our moorings to Lymm where there is a 240 volts mains electricity hook-up and the generator is kept at home unless needed. During the course of the year new beading was fitted to some of the boat's windows, the last original fluorescent light was replaced and an LED reading light fitted on the outside of the toilet compartment bulkhead. Before the water tank was filled at the start of the 2010 cruising season, red Hammerite Smooth was used to repaint the bow water line as an experiment to see how it would last in water. If the experiment proves successful I will consider painting the whole of the hull with black Hammerite Smooth. Prior to the 2010 Summer Cruise the leaking calorifier was addressed. This would entail either more major surgery to the rear deck support steelwork to allow the calorifier to be removed or alternatively, cut it up in situ and remove it piece by piece. I went for the easy option of cutting it up in situ. The replacement was slightly narrower but taller which also allowed it to be installed without the aforementioned surgery. When the calorifier leaked it damaged the starter motor which was replaced at the same time (again).
One of the window frames with the new beading fitted
The bow waterline newly painted with Hammerite Smooth
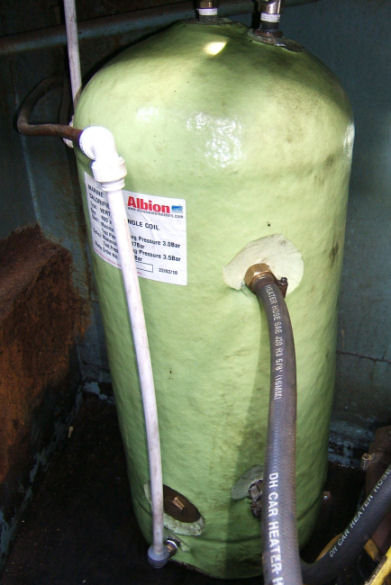
The new calorifier after installation
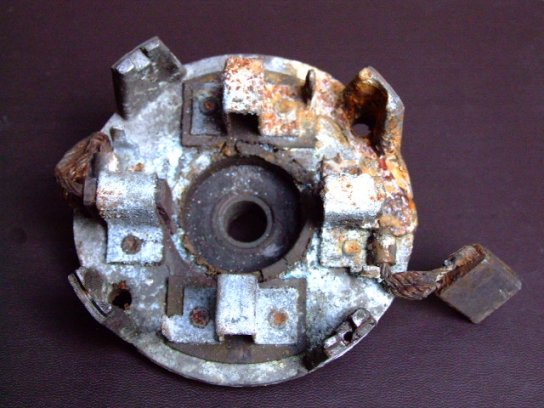
The corroded brush holder on the starter motor that was replaced
Even though the water system is drained every winter, the ultra-low temperatures (down to -19°c) endured during the winter of 2010/11 we suffered a burst pipe in the cold water feed to the calorifier. "Total Eclipse" is plumbed with obsolete Imperial ½ inch pipe work and replacing the affected part of the pipe was proving more difficult than I ever imagined. The leak was located in the cupboard under the sink and I planned to cut out a short section of the pipe and in the gap plumb-in a tee with a drain cock on the spur so that the water can completely drained any out of the system. I was having difficulty obtaining ½ inch fittings so it was suggested that I filed out a 15mm fitting and the outside of the pipe. As Imperial copper pipe has a thicker wall than metric pipes this would not affect the integrity of the joint or pipe. I installed myself virtually inside the cupboard and filed... and filed... and filed stopping periodically to see if the olive would fit. I could not get a decent stroke on the file and after filing for two hours I gave up in disgust and all for the sake of a few thousandths of an inch! A few friends promised to look in their lofts and tool boxes to see if they had any old Imperial fittings that I could use. In the meantime I scoured the Internet. A source of fittings was found on eBay America but the supplier does not ship outside the USA. A temporary solution to the problem was to use flexible hose secured by Jubilee clips until the correct fitting can be located. Around the same time the hardwood (Iroco) window surrounds were removed, planed, refitted and revarnished and a new button fender fitted to the stern.
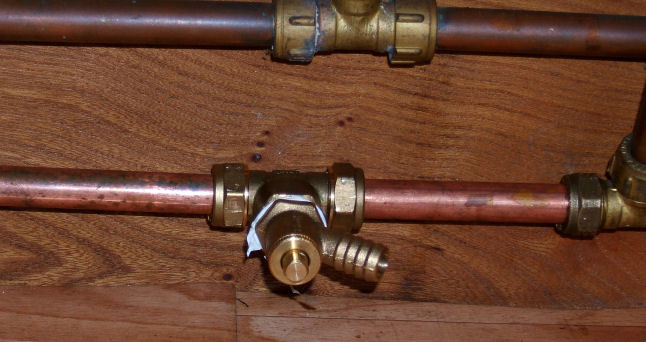
New pipework and temporary coupling solution (aka - flexible hose and Jubilee clips)
Newly varnished hardwood window surrounds
New stern fender
In the spring of 2011 the cabin side panels were starting to look a little the worse for wear. We decided that we would repaint them but there was a problem... International Paints, in their infinite wisdom had discontinued their "Toplac" in Pillar-box Red as they had discontinued Deep Water Green. The previous year we had repainted the roof and due to Deep Water Green not being available we tried to match it from Rylard Paint's colour chart. Union Canal Green was almost a match but after application it seemed too blue. Consequently, all the main colour scheme of the boat was obsolete. After emailing International Paints requesting information and with no reply forthcoming we contacted Rylard Paints in Liverpool. They told us that they might be able to match the green and red finishes but would require a sample to work from. I hunted through our shed and discovered a couple of old tins of Deep Water Green and Pillar Box Red that contained mainly skin. I sent them a sample of skin plus the old tin lids and they replied a couple of days later telling me that they could match the colours. The only problem was that there was a minimum order of two two and a half litre tins for each colour at a price of £45.00 for each tin. After deliberation we decided that it would cost considerably more to completely repaint the boat (in a colour that we didn't particularly like) and ordered two tins of each colour of paint. Just over a week later the paint was delivered to Thorn Marine... our local boat chandlers. Good customer service indeed. Well done Rylard Paints! The paintwork was sanded down and repainted just in time for our 2011 Summer Cruise. All that was needed now was the name painted on the cabin sides and this was later to happen in an unexpected way.
The final finish from the Rylard gloss paint after repainting
Around the same time we noticed that there was corrosion in the shower tray sump and after playing with ideas to patch it up we was decided to have a plastic liner made to go inside the tray. This was produced by Goodwin Plastics of Haslington near Crewe who advertised in "Canal Boat" and "Waterways World" magazines. They were given the dimensions on a Monday, quoted £83 to make it out of white polypropylene when this quote was accepted the tray was ready for collection on the Wednesday. The tray liner fitted perfectly and after sealing strips were fitted to prevent splashed entering the forward bilge was as good as if not better than new. Yet another example of excellent customer service and a company that we cannot recommend too highly.
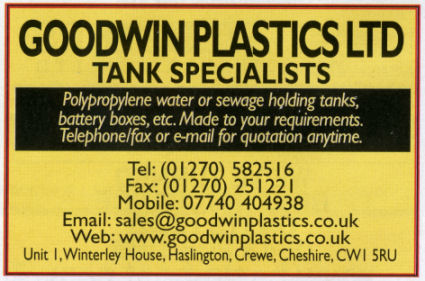
Goodwin Plastics' advertisement in "Canal Boat" magazine
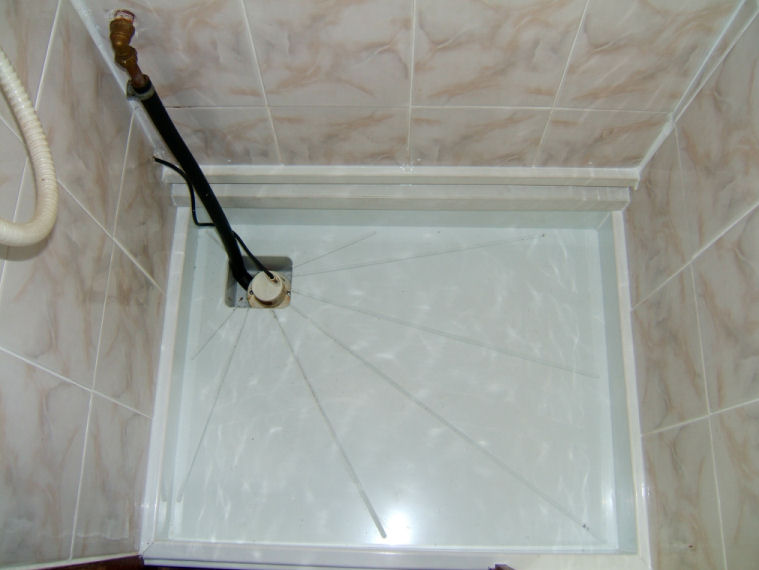
The new shower tray when installed
We had long had plans to have the boat's name painted onto the cabin sides (see "Canalscape - Book 7 - Canalmanac 2007") but in the meantime printed signs were stuck in the front cabin windows. For my sixtieth birthday present our friends Michelle and Ian Gilbody had the boat's name painted (unbeknown to me) on the cabin sides using the image later on in this section as a template. Paul the sign writer even managed to do it in the same font. After owning "Total Eclipse" for ten years she now had her name (and ours) for all to see instead of printed and laminated signs stuck in the windows.
The sign writing on "Total Eclipse"
The cabin side showing the position of the sign writing
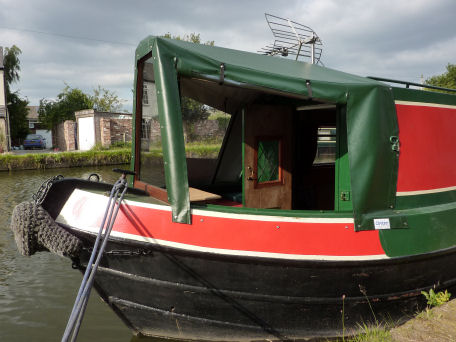
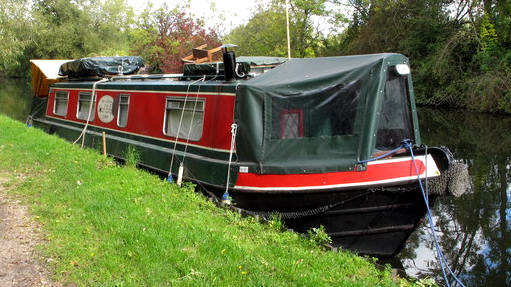
The rear deck canopy was over twenty years old and needed replacing mainly due to my damaging it on the Llangollen Canal in 2010. But due to the cost of them running to over £1k this had to wait until our "canopy fund" had a few more pennies in it. The major fault on it is the zip fastener on the right hand side screen which had broken and I hit upon an idea to replace it. Instead of another zip why not replace it with self-adhesive Velcro? A suitable length of a heavy duty variety was purchased from our local fabric shop and after replacing the broken "lift dot" fasteners I set to work removing the old zip. This didn't prove to be too difficult as the cotton had started to rot. The Velcro is self adhesive and the inside piece was cut to length and stuck onto the material once all the old cotton was removed and the area cleaned. The flap that the other piece was to be fitted to is too narrow for the full-width Velcro so I cut it in half down its length and stuck into position. Initially, this worked well and when the side panel was put back in place the two parts of the Velcro "knitted" together well but I made the mistake of sticking the Velcro on in cold weather. I also replaced the damaged "lift-dot" fasteners at the same time.
The inside of the rear deck canopy with Velcro replacing the broken zip fastener
After a couple of weeks the adhesive came unstuck on the exposed part of the cover and it came apart. Well... it seemed a good idea at the time but we had to bite the bullet and contacted Coverit Boat Canopies to come and measure for a new canopy and give us a quote. They promised to do this and we are now waiting for them to come and give us the bad news as to how much this will cost... I'm betting about £1700! Thanks to Ange's bargaining skills we forged a deal with Coverit to make a new rear canopy and dodger plus a cratch cover over the front deck for a really good price. The type of canopy we specified was one that does not require a glazed timber windscreen but has an extra hoop frame and a section sloping down to the cabin roof with a "zippable" clear PVC section to act as a windscreen. The template was made and two days later the completed canopy was fitted and exceeded our expectations. The cratch was being made by Ian Gilbody and when completed Coverit are returning to make a template and again to fit it. The British Racing Green PVC matched the boat's paintwork well and the canopy was nicely shaped to match the boat's line.
The completed and fitted new canopy by Coverit
The windscreen had a steeper rake than the old timber one had and gave a better view as well as a greater feeling of spaciousness. Closer examination showed a couple of things that needed slight modification such as there was no zip allowing the windscreen portion to be rolled up when necessary, flaps would need to be stitched on behind the cleats to prevent rain ingress and straps to support the side screens when rolled up. We also think that rain might enter where the handrails pass through the canopy and where the canopy attaches to the cabin roof. After discussing it with Gary we plan to fit a thin batten behind the windscreen to guide any ingress of rainwater to the edges of the roof where it will run down the cabin sides. The couple of slight modifications to the canopy will be made when the cratch cover template is made.
It fits well, looks fantastic...
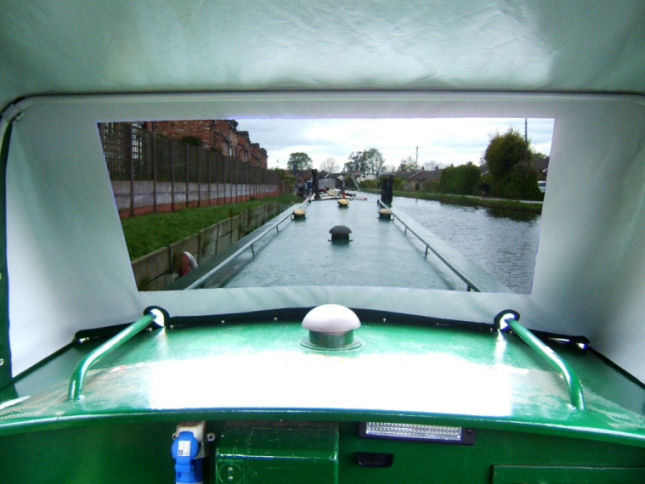
... and offers a really good view through the windscreen
The futon that we installed in 2008 was awkward to open out into a bed so we looked at a "click-clack" type sofa bed to replace it with. After visiting local furniture shops and scouring the Internet a brown leather example was ordered from Amazon. This is more comfortable that the futon and is much easier to convert into a reasonably sized bed. It was installed before the cratch and front deck canopy was fitted which is just as well as the cratch and front deck canopy would both have to be removed prior to it being installed.
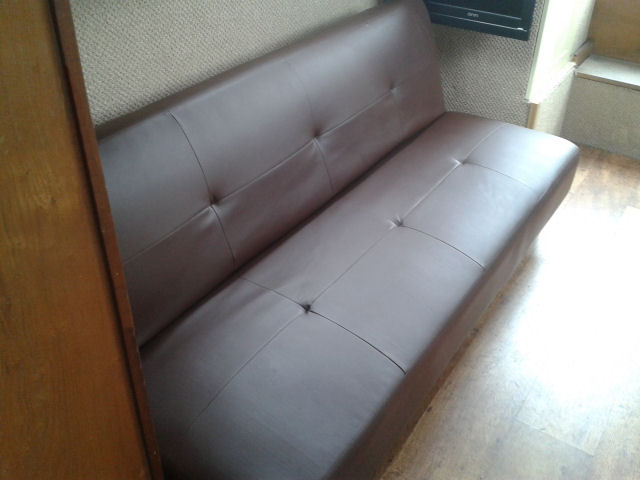
The new sofa bed was a perfect fit
A month after the new rear canopy was fitted "Total Eclipse" was slipped at Lymm CC for hull cleaning and repainting. Previously the hull was painted with black gloss oil-based paint but, due to supply problems caused by EEC regulations bitumen was applied to the red oxide hull paint after as much of the original gloss black had been removed. Additional rubbing strips were welded to the rear swim to protect the base plate. The welder also welded a steel patch over the original location of the solid fuel fire. There were slight changes to the boat's colour scheme at this time... the white paint on the bow and stern was replaced with beige to match the coach lining. The red water line at the bow was no longer applied with bitumen being applied in its place.
Slipped on 9th June 2012 with the black gloss paint removed, jet-washed and ready for repainting
Half painted - the black gloss paint replaced with bitumen
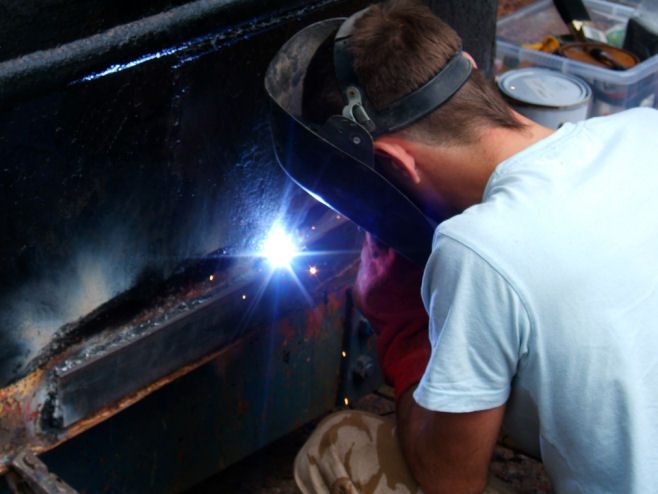
The new port rubbing strip being welded to the rear swim
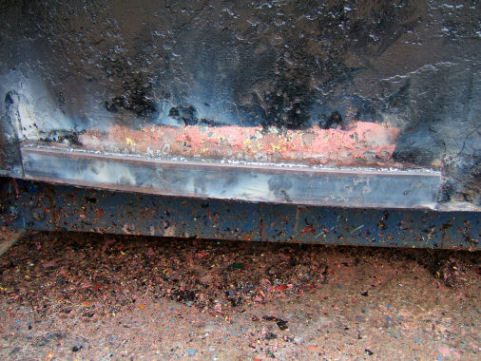
The starboard rear swim rubbing strip after being welded in place...
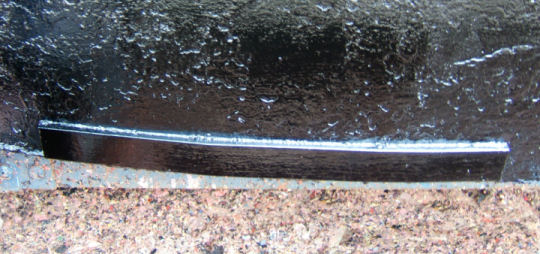
...... and after painting with red oxide and bitumen
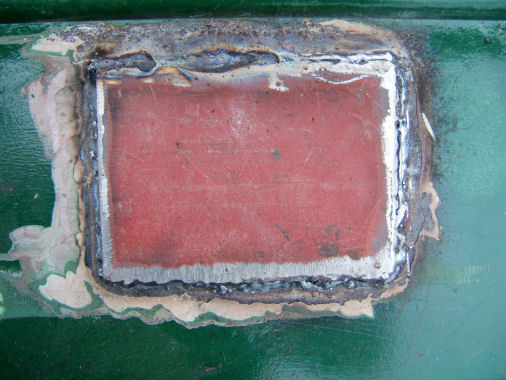
The roof patch where the solid fuel fire was previously fitted...
... and after filling and painting
Painting completed and ready for relaunching 15th June 2012
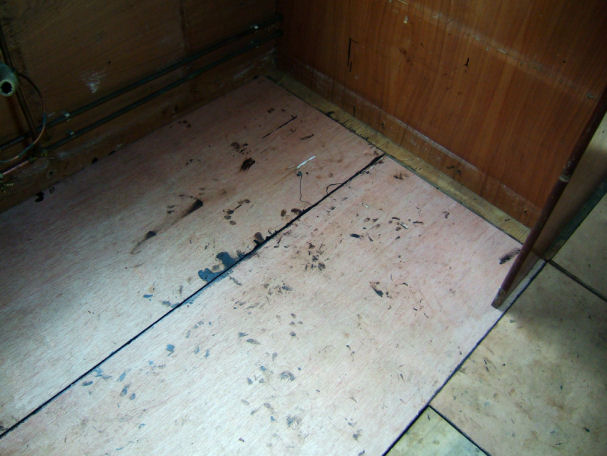
During 2012 we noticed that part of the floor in the cabin adjacent to the kitchen was showing signs of "sponginess". I had put this down to water collecting in the lowest point of the front bilge by the back door from a leaking window and the patch over in the roof where the solid fuel stove used to be. I decided to lift the laminated floor and replace the offending section of floor which I had previously done nearly ten years ago. The plywood had indeed started to rot but on inspection the water damage had spread to the whole of the kitchen area.
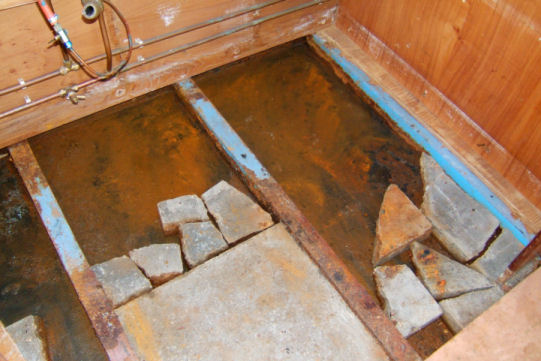
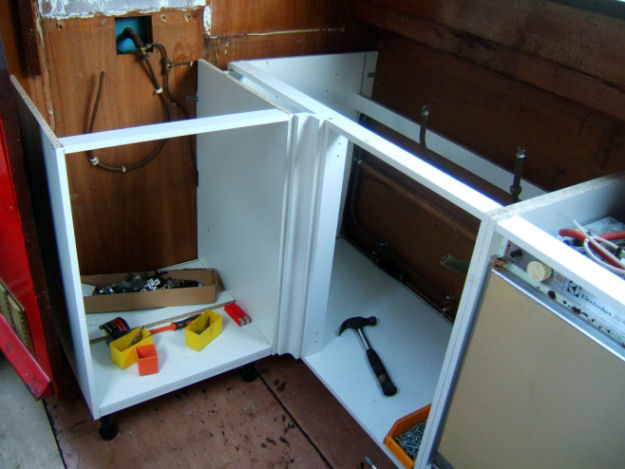
The floor and kitchen removed exposing the top of the base plate
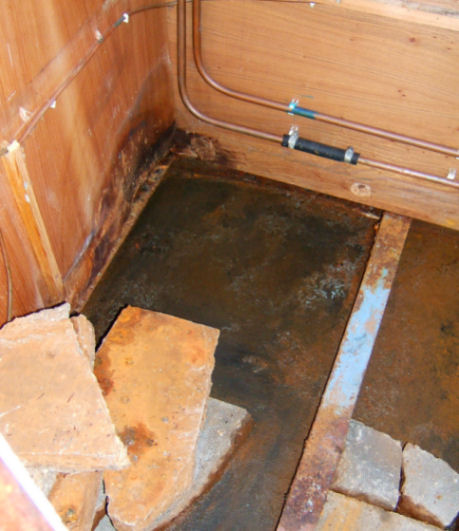
Damage to the lining caused by a leaking pipe
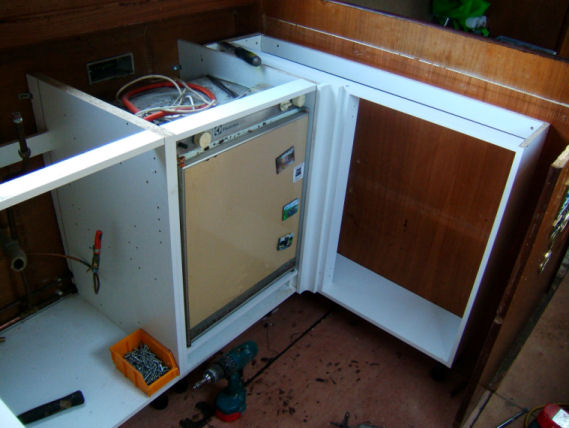
We made the decision to replace the floor in that area as well but that necessitated removal of the kitchen. We decided that as the kitchen would also have to be removed now might be a good time to replace it as well. It appeared that water had been also been leaking from a hidden pipe which had damaged part of the cabin lining on the rear bulkhead. Whilst the top of the base plate was exposed it was painted with bitumen as was the underside of the new floor boards before laying then in position... not as easy (or as clean) as it sounds... especially when the boards have just been painted on the underside with bitumen. The boards had to fit beneath the room divider and the cooker draught screen behind the door. This proved especially difficult as it was the last piece of the jigsaw puzzle to be completed.
The new floor boards fitted ready for the new kitchen units, cooker and sink to be installed
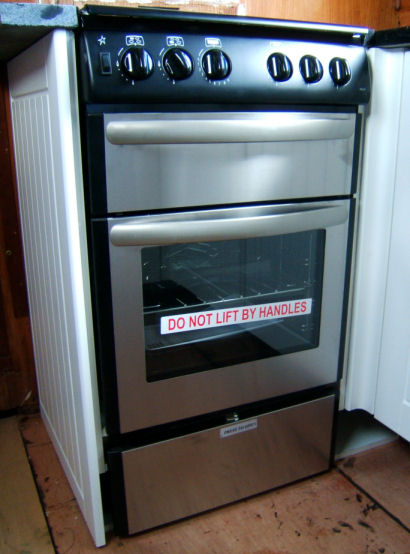
With the kitchen units removed and the new floor boards fitted we decided to scrap the old Valor Vanessa cooker and sink unit as well but would have to retain the Electrolux RM 212F refrigerator and overhaul it as to replace it with another of the same type would contravene the Boat Safety Certificate. To install a new gas one would cost well over four figures. A mains model would require an inverter and additional batteries which was not considered. The nearest possible replacement would be a 12 volt model but this would also require additional batteries but would be the most affordable and current efficient option. When the Electrolux reaches the end of its life this will be the option that we will go for but as it is working perfectly we will retain it for now. After looking in boat chandlers and searching on the Internet, the cooker we had settled on was the Stoves 500 DIT "built-in" unit that we had seen at Midland Chandlers.
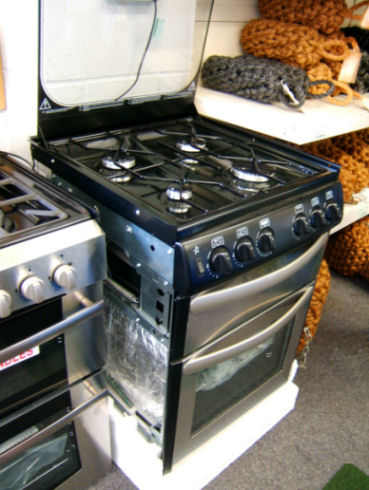
Stoves 500 DIT cooker
It was more solidly built than others we looked at and features a safety cut-out so that when the glass hob cover is lowered the gas supply to the burners on the hob is cut-off. Thus protecting the toughened glass lid from shattering from the heat from the hob burners if accidentally left on. It also featured a pan cupboard beneath the oven and seeing as the cupboard for that purpose was removed with the old cooker this would prove to be quite necessary.
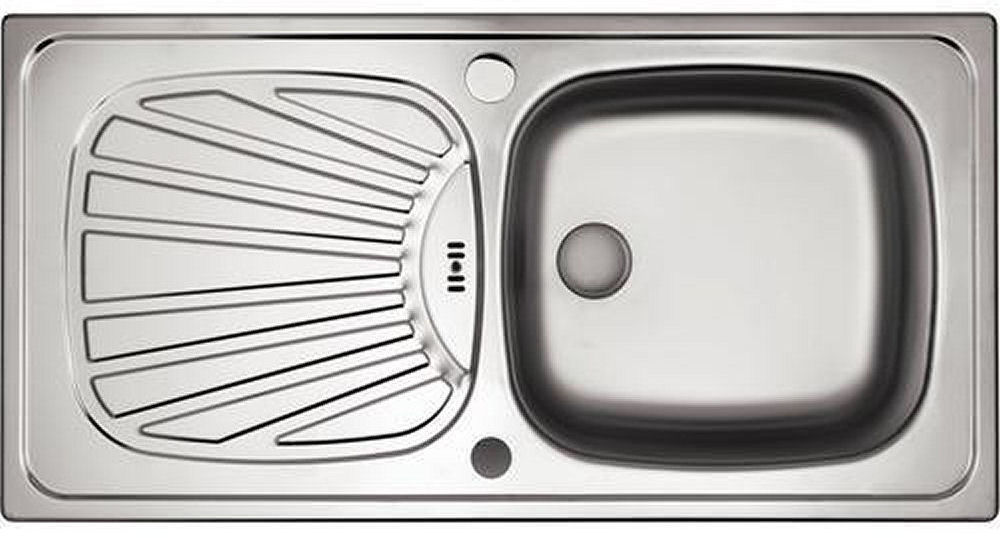
The sink and drainer that we eventually settled on
The sink we originally decided upon was a Pyramis circular one with a separate matching drainer and sourced from Screwfix. The beauty of the separate drainer is that the drain hole can be located at the lowest point of the drainer to prevent water collecting due to the boat being slightly stern down. Due to problems associated with cutting the marble worktop we decided to go for a more conventional sink and drainer.
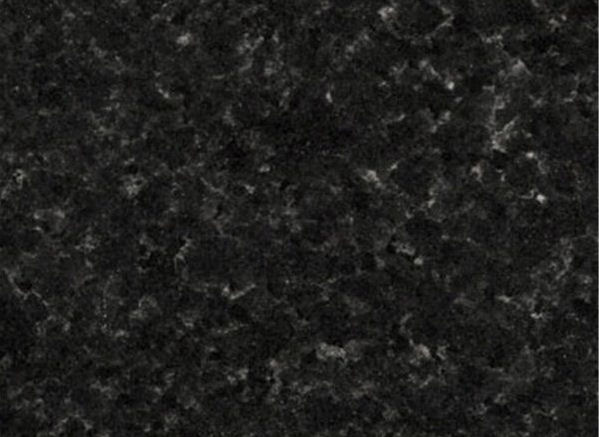
The grain in the black granite worktop
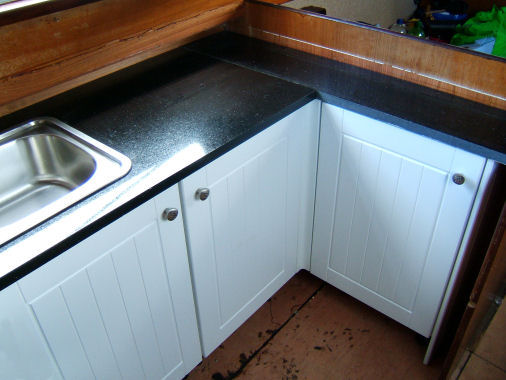
Even though we had decided on our sink and cooker, one thought that came to me was whether or not the cooker would fit through the door. We were conscious of having to have it reserved at Midland Chandlers. The front door was the widest at 520mm and seeing as the cooker was 500mm wide (according to Midland Chandlers) we could go ahead and have our name put on it. The units chosen were white "Edmonton" kitchen cabinets from Wickes and we a black granite worktop was given to us by our friends Ian and Michelle Gilbody.
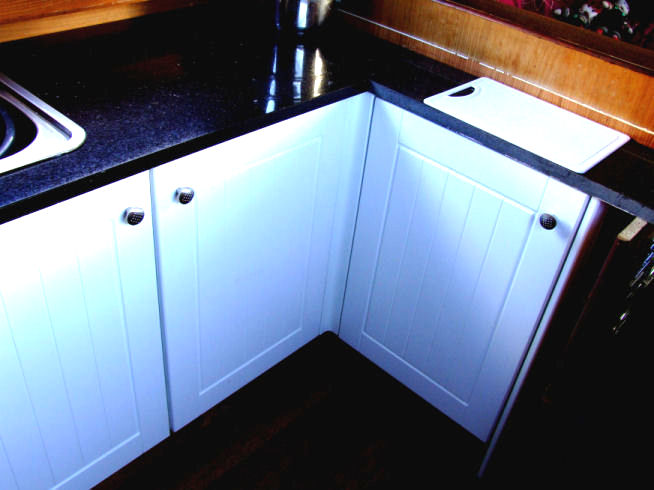
The kitchen units assembled and in place...

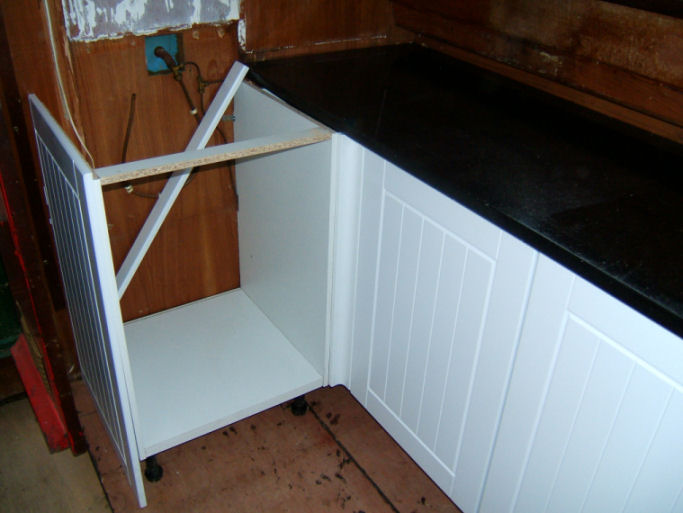
... and completed with the granite worktop in place
We assembled and fitted the carcasses for the kitchen units and had to visit Midland Chandlers to take some additional measurements from our proposed new cooker in order to set the cooker housing carcass (four inches deeper than anticipated). This four inches would be robbed from the cupboard opposite to maintain the kitchen space. After this we set the kitchen unit carcasses and relocated the fridge in its own unit. The worktop was in two pieces and the larger piece is the heaviest thing I have ever lifted in my life. You would not believe the juggling act we had locating it in the kitchen and what's more it would have to come out again... twice! Once they were in position I also checked the boat's trim to make sure that everything was in order in this department and, much to my relief, it did not appear too dissimilar to how it was before. After doing this we took the pieces off the boat, cut them and put them back into position on the boat. The larger piece would have to be removed again to cut it for the sink and drainer. The round sink and separate drainer was, as previously mentioned, discounted and a different pattern was sourced from eBay.
The sink and drainer fitted
The next step was to remove the worktop and cut it to accommodate the sink and drainer... harder work than it sounds. When the sink and drainer was unpacked we discovered it was not exactly the same as illustrated on eBay but we liked it nonetheless and it when the worktop was cut and refitted onto the boat it was installed. The granite work top off-cut was placed beneath the kitchen units as additional ballast. The water supply was connected to the mixer tap and the water pump turned on.
Once in the boat the cooker fitted perfectly
Once pressurised there was a small leak on a "Conex" joint but this was soon tightened and we turned our attention to the cooker. In theory it should have fitted through the front door but it had to be removed to get the cooker into the boat. It fitted perfectly in the kitchen unit but the existing gas pipe work would need modification before it could be permanently screwed into place, the 12 volt power supply for the ignition and the gas supply connected.
The laminate floor re-laid and cooker connected ready for action
After cutting a couple of small fill-its for either side of the cooker and we could go no further until the gas supply was attended to. After tidying up we measured for a wall cabinet to be fitted above the cooker. It will cover the old electrical cupboard and provide extra cupboard space in the kitchen. The next step was the re-laying of the laminate flooring after which the kick boards could be fitted. White wall cladding and the wall cupboard was next fitted to cover up the old varnished wall panels and make the kitchen brighter. Additional wall panels are to cover the tables and fridge door.

The wall cupboard and cladding fitted
With all the wet weather we had the windows were showing signs of leaking. Starting with the kitchen and port/front windows the frames were removed, old sealant cleaned off, metalwork and window frames cleaned and refitted with new mastic sealant. The remainder of the windows are to be similarly treated when the weather allows.
One of the windows removed prior to resealing and refitting
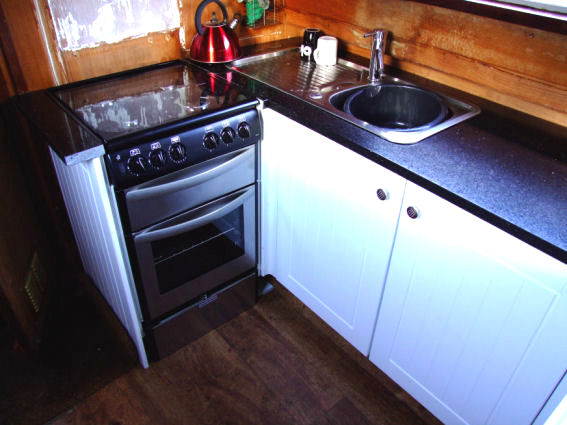
Current layout of "Total Eclipse" showing the refitted kitchen
Looking aft with the refitted kitchen - January 2013
Coverit temporarily fitted the new cratch and to measure for the cratch cover. The track for the sliding support for the rear canopy was also fitted at this time allowing the rear canopy to be folded down behind the tiller swan-beck. The cratch and foredeck cover were finally fitted on the 18th July 2013. A little later a new headlamp bracket and headlamp was fitted. The TV aerial socket was moved to the rear of the cratch plank.
Gary from Coverit temporarily fitting the cratch
The cratch cover template in position
The sliding support and track for the rear deck canopy
Cratch cover fitted both closed and open
Front deck after cratch and cover fitted
New cratch with the headlamp fitted
Just before our 2013 summer holiday cruise the cooling system was giving cause for concern. The raw water cooling water pump was leaking and was refurbished with a new seal, gasket and impeller. The feed pipe was replaced at the same time ( 20th July 2013) as was the closed water system filler cap. After completion cooling water was not being drawn through the water strainer which was eventually traced to the water strainer lid drawing in air preventing effective suction. This was remedied by greasing the lid seals and gradually tightened down until water was being drawn in.

Water strainer (open) and mud box
On our summer cruise we used the oven in the new cooker for the first time. We expected some initial smoke and smell but after a minute or so black smoke started to come from beneath the cooker. A visual inspection showed flames beneath the cooker and the gas supply was shut off immediately. Later removal of the cooker showed that a leaking gas union had caused the fire to be lit when the oven was lit. Tightening of the union remedied the problem but this and other problems such as the water pump saga caused a loss of faith in the boat. This coupled with certain parts of the engine (like the alternator for instance) being impossible to reach without removing the steel steps leading from the rear deck into the boat which were becoming too heavy for me to manage (as was brought home to me when I had to tighten the alternator belt in pouring rain in the middle of Grub Street Cutting on the "Shroppie") and with Shannon spending more time with us the internal layout did not offer her or us much privacy convinced us that it was time to let "Total Eclipse" go, When we saw a certain Liverpool Boat Company narrowboat for sale at Midway Boats of Barbridge Junction, which we fell in love with, it was decided that we would part-exchange "Total Eclipse" for it. The internal woodwork was rubbed down and painted and the boat generally made more appealing for when it was valued for the part-exchange.
Being slipped at Aqueduct Marina for the hull survey
Undergoing the hull survey at Aqueduct Marina
The subsequent valuation was subject to a hull survey which was eventually undertaken at Aqueduct Marina. In the meantime we returned the boat to Lymm and the water pump started to leak again. After ordering a replacement water pump and fitting it the boat was brought to Aqueduct Marina over a weekend for the hull survey which was to take place later on in the week. The boat passed the survey with flying colours and the surveyor could not believe that a thirty year old boat was giving readings as high as it was. With the survey completed the figures were confirmed and we arranged to part-exchanged the boat on the 22nd of August 2013. The last photograph that I took of "Total Eclipse" (below) was at Barbridge when she was moored next to our new boat whilst our belongings were being transferred.
"Total Eclipse" next to "Squirrel" at Barbridge Junction on the 22nd of August 2013
|
Major Milestones in the life of Hancock and Lane Job No 2755 |
|
|
13-08-1982 |
Hancock and Lane job number 2755 completed |
|
05-11-1982 |
Exhibited at The Boat Show, Earl's Court, London |
|
01-03-1983 |
2755 purchased by Mr V Jones for £12681.75p and christened "Cordelia" |
|
1983 |
"Cordelia" sold to Mr D Reed and moved to Preston Brook Marina, Bridgewater Canal |
| 1984 | Centaflex propeller shaft coupling fitted |
|
1987 |
Holding tank and flushing toilet removed, "Portapotti" and "Torgem" solid fuel fire fitted |
| 07-1987 | "Cordelia" dry-docked at BMBC Runcorn for hull cleaning and painting |
|
1989 |
Windscreen, front and rear deck canopies fitted and ventilators changed to mushroom ventilators |
| 11-1999 | Passed first Boat safety Certificate |
|
03-2001 |
Cyril Wood took over responsibility for "Cordelia's" maintenance and up-keep |
| 03-2001 | Starter battery replaced |
| 03-2001 | Stuart Turner water pump replaced with Sureflo pump and accumulator sphere |
| 04-2001 | 240 volt ring main fitted and two of the original fluorescent lights replaced |
|
05-2001 |
Replacement of floor adjacent to kitchen and stern greaser moved onto rear deck |
| 06-2001 | Kitchen tiled |
| 15-02-2002 | "Cordelia" dry-docked at BMBC Runcorn for hull cleaning and painting |
|
16-07-2002 |
"Cordelia" bought by Angela & Cyril Wood and re-christened "Total Eclipse" |
|
09-2002 |
"Total Eclipse " moved from BMBC's Walton moorings to Lymm CC's Oughtrington mooring |
| 01-11-2002 | Passed Boat Safety Certificate. Examiner - Mel Blakey |
| 4-2004 | Additional leisure battery fitted and wiring renewed |
| 07-2004 | Sipped for hull cleaning and painting at Lymm CC |
|
04-2005 |
Commenced installation of Carobo solid fuel fire and partial refitting |
| 05-2005 | Toilet compartment, triangular cupboard and Torgem removed |
| 31-10-2006 | Passed Boat Safety Certificate. Examiner - John Taylor |
| 04-2007 | Television cupboard constructed in front cabin |
| 05-2007 | Laminate flooring fitted to kitchen area |
| 2-2008 | Leisure battery replaced |
|
03-2008 |
Original bunk in front cabin removed and sofa bed installed |
| 04-2008 | Cabin lining below gunwales carpeted |
|
05-2008 |
Permanent seating installed on rear deck and boat slipped for hull painting at Lymm CC. Roof also painted |
| 07-2008 | Leaking calorifier repaired, new fender eyes welded in place, toilet compartment light replaced with an LED unit |
|
14-03-2009 |
Laminate flooring fitted throughout the boat |
|
06-2009 |
Windscreen replaced and navigation lights fitted |
|
07-2009 |
Alternator replaced by 70 amp Lucas A127-L0223 and "spin-on" type oil filter assembly fitted |
|
08-2009 |
Glass fronted oak corner cupboard fitted adjacent to front bulkhead |
|
19-12-2009 |
Starter motor rebuilt |
|
01-2010 |
"Total Eclipse" moved to Lymm CC's Lymm moorings |
| 02-2010 | Stern gland overhauled and re-packed |
| 03-2010 | Commenced fitting beading to window frames and cabin paintwork touched-up |
| 03-2010 | Experimented with red Hammerite Smooth along the bow waterline below the bottom rubbing strake |
| 06-2010 | Cabin roof repainted and more window beading fitted |
| 30-06-2010 | LED reading light fitted and last remaining fluorescent light unit in kitchen replaced with a centre of ceiling unit |
|
17-07-2010 |
Leaking calorifier cut-up in situ and replacement Albion 50 litre model installed |
| 22-07-2010 | Starter motor replaced with refurbished model and redundant cables removed from wiring loom |
| 01-11-2010 | Passed Boat Safety Certificate examination. Examiner - Graham Thornton |
| 08-11-2010 | Extra fuse fitted to 12 volt domestic feed, refrigerator gas isolation valve replaced fuel filler labelled, fire blanket relocated and starboard third window re-sealed |
| 26-03-2011 | Hardwood window surrounds removed, planed, refitted and varnished |
| 26-03-2011 | Burst calorifier feed pipe replaced and drain cock fitted beneath kitchen sink |
| 17-04-2011 | New stern fender fitted and missing pipe fender replaced |
| 20-04-2011 | Fore, aft and centre ropes replaced - original ropes used solely as mooring ropes |
| 24-04-2011 | Kitchen Venetian blind replaced with a roller blind |
| 02-05-2011 | Stern greaser pipe fitting replaced |
| 07-06-2011 | Certificate of Seaworthiness issued |
| 22-07-2011 | Roof, gunwales, cabin side panels and white coach lines sanded down and repainted |
| 23-07-2011 | |
| 21-10-2011 | |
| 30-11-2011 | |
| 23-03-2012 | New domestic batteries fitted |
| 25-03-2012 | Alternator drive belt adjusted and rear steps altered for ease of removal |
| 24-04-2012 | New sofa bed installed in lounge |
| 27-04-2012 | New rear canopy and dodger fitted |
| 09-06-2012 | Sipped for hull cleaning and painting at Lymm CC |
| 12-06-2012 | Steel patch welded where stove chimney socket was originally located and additional rubbing strips welded to rear swim |
| 13-06-2012 | Stern gland overhauled and lubrication pipe replaced |
| 15-06-2012 | Damaged portion of ceiling replaced |
| 15-06-2012 | Starboard deck boards replaced |
| 04-08-2012 | Carpet tiles replaced on rear deck and old rear deck light removed |
| 21-08-2012 | |
| 08-09-2012 | Cabin floor replaced adjacent to back door and kitchen |
| 15-09-2012 | Commenced fitting new kitchen |
| 22-09-2012 | |
| 29-09-2012 | |
| 11-10-2012 | Laminate flooring refitted |
| 13-10-2012 | Gas system overhauled and new cooker connected |
| 30-12-2012 | |
| 05-01-2013 | |
| 21-06-2013 | Cratch board temporarily fitted and front deck cover template made. Sliding support for rear canopy fitted |
| 18-07-2013 | Cratch fitted cratch cover fitted |
| 18-07-2013 | Raw cooling water pump refurbished and feed pipe from mud box replaced |
| 20-07-2013 | New raw water drive belt & water pressure cap + water strainer seals replaced |
| 25-07-2013 | New headlamp fitted and connected + TV aerial socket moved to cratch board plank |
| 06-08-2013 | Damaged cabin lining painted |
| 08-08-2013 | Touched-up hull blacking |
| 18-08-2013 | Jabsco raw water pump replaced |
| 22-08-2013 | Hull survey at Aqueduct Marina |
| 22-08-2013 | Sold to Midway Boats at Barbridge Junction in part exchange for nb "Gill" later to be renamed "Squirrel" |
| 26-09-2013 | Bought by Gary from London and taken down there permanently |
Other Examples and Similar Designs
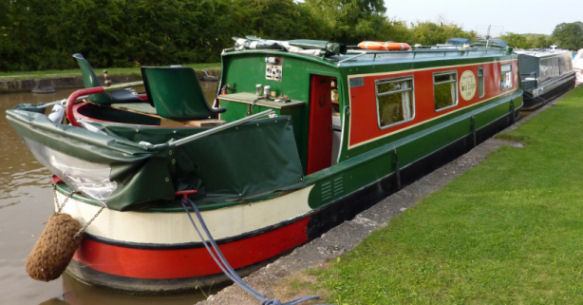
A sixty foot H & L "Norseman" seen at Lymm in 2008
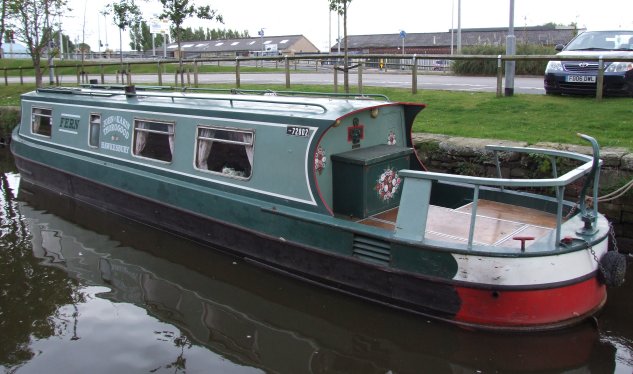
"Total Eclipse's" twin... nb "Fern" seen here at Wigan in 2009
Paul Woolley is a regular reader of "Canalscape" and he contacted me recently regarding the job number of his boat and the build date. His 1981 forty foot H & L has been refitted and recently repainted. It is a credit to him. We frequently see other examples of Hancock and Lane narrowboats. They are usually identified by the line of the hull and cabin, profile of the handrails, flat-topped rear door shape, handrail and supports, positioning of the gas bottle locker, positioning of the engine compartment ventilator grills, "T" studs and fuel filler plus many smaller details. However, since Hancock and Lane ceased building boats in the early 1990s there have been a couple of revivals of the "Norseman" designs. Colecraft as well as R & D (founder Ray Denton started his boat building career with Hancock and Lane) were producing similar boats up to the present day and exhibit many similarities. In fact, on the surface they appear to be the same design but there are subtle differences to tell them apart. This is not surprising really as many Hancock and Lane employees went to work for these boat builders when the company closed down. The "Norseman Classic" was produced by Bidston Narrowboats of Birkenhead and sold by Classic Boats in the early 2000's. It was available in 45 ft, 57 ft and 65 ft lengths. In these boats there was a deviation from the original H & L design with the inclusion of portholes aft instead of the more usual windows to accommodate the aft bedroom layout. They were produced up to 2004 when the manufacturers... Bidston Narrowboats based at the old Cammell Lairds complex in Birkenhead ceased production. When examples come onto the second-hand market they are eagerly sought after and are usually higher priced than similarly aged and specified craft.
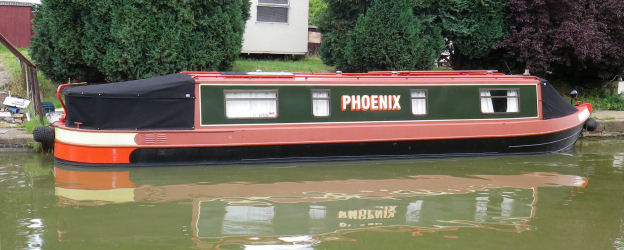
Paul Woolley's excellent forty footer... "Phoenix"
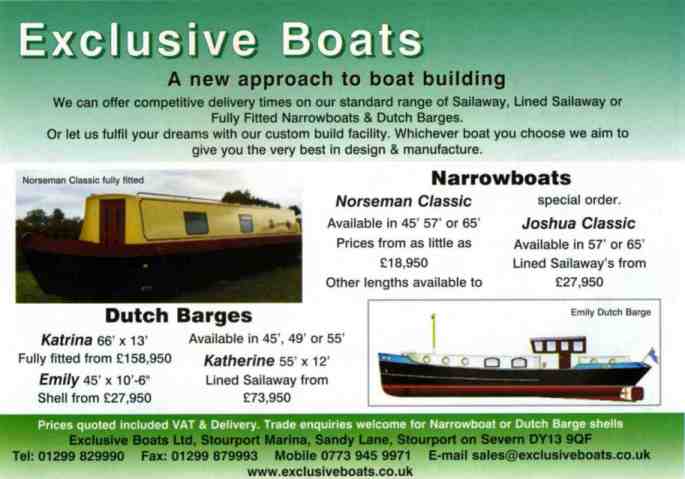
An advertisement for the now discontinued "Norseman Classic"
The most recent renaissance of this classic narrowboat design is the Calcutt "Clipper" range of boats built by Calcutt Boats, Southam in Warwickshire. The boat is available in various lengths up to fifty feet long and current prices are around a thousand pounds per foot. This design even retains the BL 1500/Newage PRM engine and gearbox combination. There are various modern touches to the design but, as the photograph below illustrates, the design bears an undeniable resemblance to the original H & L "Norseman"... more so than the Exclusive Boats' "Norseman Classic".
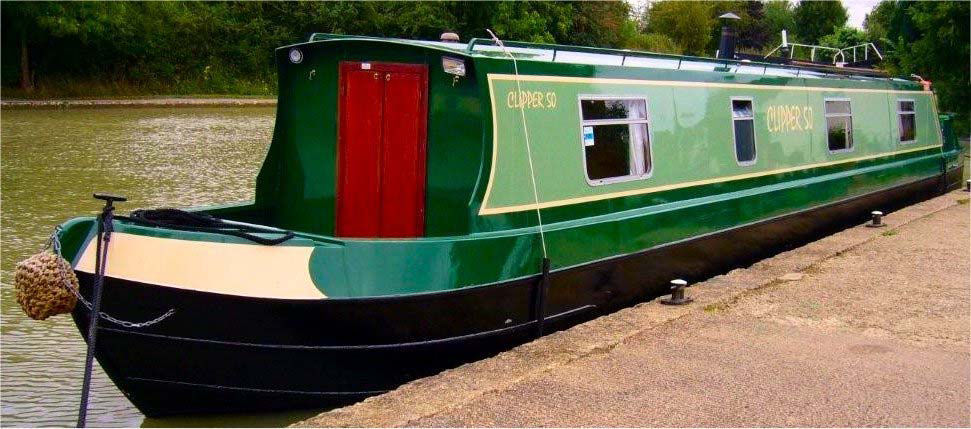
The Calcutt "Clipper"... a reborn Hancock and Lane "Norseman"
(Photograph - Calcutt Boats Ltd)
As well as cruiser type narrowboats Hancock and Lane also built workboats for British Waterways. Such is the standard of construction, many of these boats are in regular day to day use. Below is an example normally seen on the Bridgewater Canal at Worsley.
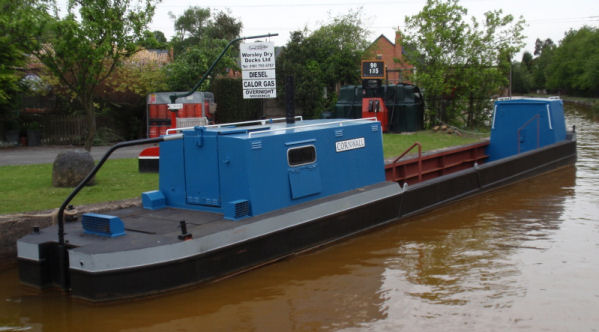
An example of a Hancock and Lane workboat
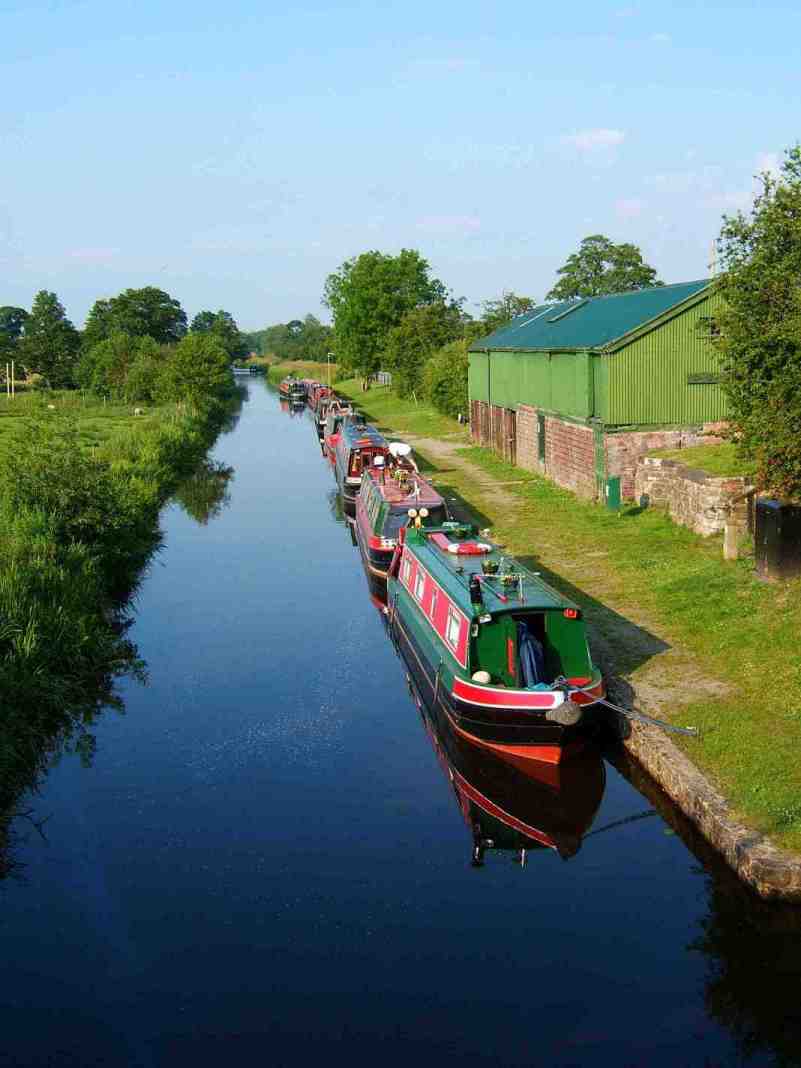
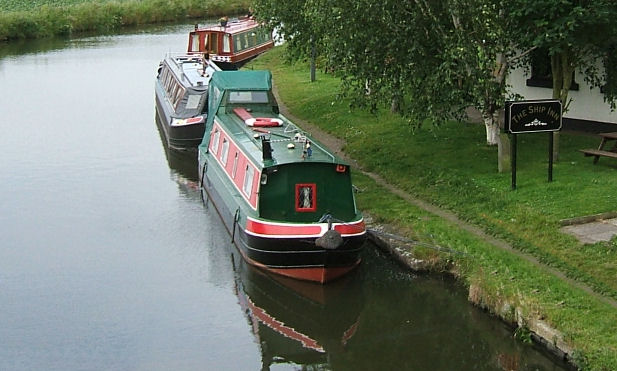
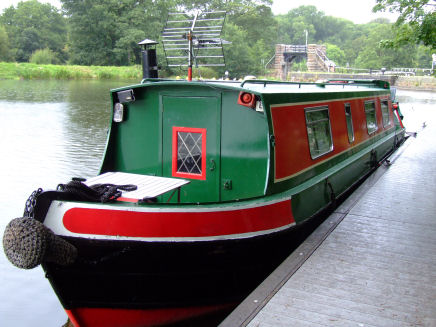
Photographs of "Total Eclipse" at various locations on our cruises

"Total Eclipse" at Anderton on our first cruise after buying her in July 2002
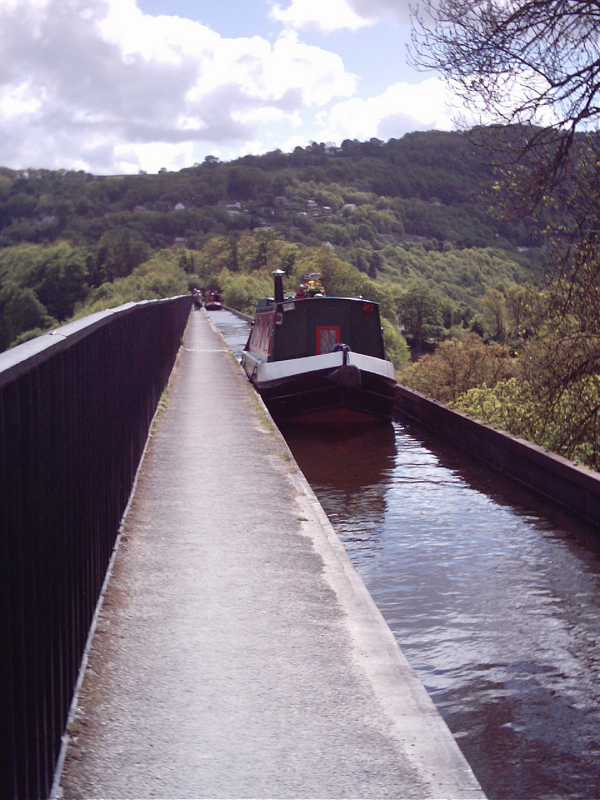
"Total Eclipse" crossing the Pontcysyllte Aqueduct - June 2003
(Photograph - Angela Wood)
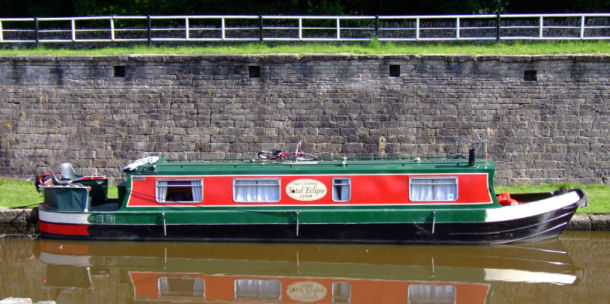
“Total Eclipse” at Queen’s Head on the Montgomery Canal - June 2005
(As featured in "Waterways World" - February 2009)

"Total Eclipse" at the Mark Addy on the River Irwell in Manchester - August 2006
"Total Eclipse" at Haskayne whilst returning from Liverpool - June 2007
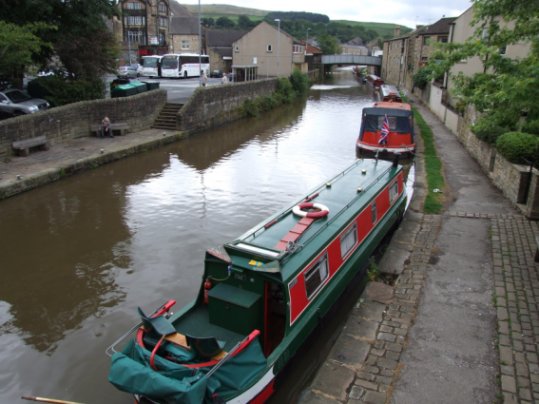
"Total Eclipse" at Skipton on the Leeds and Liverpool Canal - June 2008
The Author steering "Total Eclipse" into Preston Dock en-route to the Lancaster Canal - July 2009
(Photograph - Phyllis Greenough)
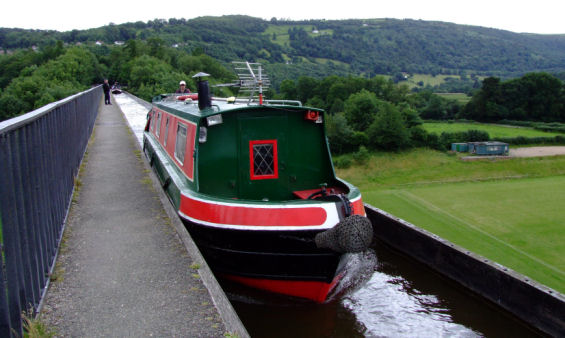
Ange steering "Total Eclipse across the Pontcysyllte Aqueduct - July 2010

"Total Eclipse" entering the Manchester Ship Canal at Ellesmere Port - August 2011
(Photograph - Jim Wood)
"Total Eclipse" above Vale Royal Lock - River Weaver (in the rain) - August 2011
"Total Eclipse" at Bugsworth Basin - Upper Peak Forest Canal - August 2012
"Total Eclipse" at Stanley Moss - Caldon Canal - August 2012
"Total Eclipse" at Norbury - Shropshire Union Canal - August 2013
So there you have it... an insight to "Total Eclipse". Even though she may not have been new or shiny or had the highest, latest specification or equipment but she did everything we asked of her and we loved her very much. Most modern boats are usually made from recycled steel whereas "Total Eclipse" is made from "fresh" steel with a higher carbon content. This is evident whenever I have to drill a hole through her steelwork and have to purchase special drill bits to go through the extremely hard steel. When she came out of the water for the bi-annual cleaning, inspection and hull blacking there were none of the rust blisters usually seen on more modern boats. This was confirmed when the hull survey was made just prior to her being part-exchanged. "Total Eclipse" was ours for eleven years and it was only near the end of our ownership that things started to go wrong more frequently. The layout was not conducive to having visitors aboard so reluctantly the decision was made to sell her. We have had many happy years on board her. She has taken us to many beautiful places and will always have a special place in our hearts. We hope that her new owner treats her with the same care and respect that we have done and that they have as much enjoyment and happiness with her that we did. To discover what took the place of "Total Eclipse" follow the link to nb "Squirrel". At the beginning of October 2013 I learnt that "Total Eclipse" had been sold and that the new owner... a gentleman called Gary and was in the process of cruising it down to London were he lives. I have since spoken to Gary and given him information about the boat's history and answered some of his questions about various aspects of the boat's design. Once at its new moorings in the Paddington area of London Gary discovered a water leak that he eventually traced to a leaking water pipe and waste pipe. As he is planning to live on the boat during the week he is partially refitting the interior to meet his needs. He has made a few changes, has promised to keep in touch and send photographs of the boat on its new mooring. We wish him well.

Total Eclipse moored in Camden on the Regents Canal
(Photograph - Hamish Stewart)
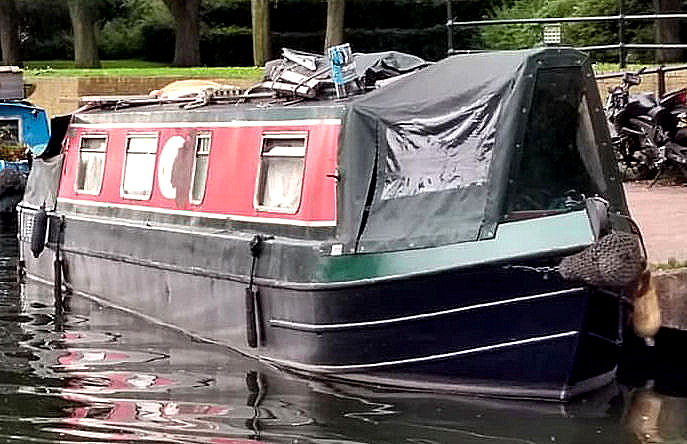
Whilst surfing the Internet recently I came across a photograph of "Total Eclipse" moored near Camden Lock on the Regents Canal. It was nice to see that it was clean with polished brasses (or at least some polished brasses) and sporting a solar panel which I knew about as Gary the current owner told me that he had fitted one. I'd have thought that he would have changed the sign writing by now though! Fellow canal boaters often tell me that they have seen our old boat in the London vicinity. This photograph was taken in 2015 and shows the boat moored on the Grand Union Canal in the vicinity of Denham Marina near Uxbridge, Middlesex. I have to say that it is looking a little scruffy and the worse for wear. I have no idea what has happened to the aft deck canopy but I can only presume that it has been damaged whilst going through a bridge whilst erected... and it still has our original sign writing on it!
Total Eclipse in 2015 moored at Denham near Uxbridge on the Grand Union Canal...
(Photograph - www.geograph.org.uk)
...and in 2019 at Stansted Abbott on the River Lee
(Photograph - Lynne Mellors)
|
or select another book below... |
||
| So You Want To Go Canal Cruising? | ||
|
|
||
|
|
||
|
|
||
|
|
||
|
|
||
|
|
||
|
|
||
|
|
||
|
|
||
|
|
Book 9 - 2013 |
|
|
|
||
|
|
||
|
|
||
|
|
||
|
|
||
|
|
||
|
|
Book 16 - 2020 |
|
|
|
|
"Canalscape" and "Diarama" names and logo are copyright |
Updated 18/08/2019